4 TasksIndex
For full marks, follow these task directions below exactly as written. READ ALL THE WORDS to work effectively and not waste your time.
- Complete the Tasks listed below, in order, from top to bottom.
- Do not skip steps.
- These tasks must be done in your account on the Course Linux Server.
- Verify your own work before running the Checking Program.
- Run the Checking Program to help you find errors and grade your work.
- Submit the grading output of the Checking Program to Blackboard before the due date.
- Your instructor may also mark on the due date the work you do in your account on the CLS. Leave all your work on the CLS and do not modify it. Do not delete any assignment work from the CLS until after the course is over.
4.1 Set Up – The Base Directory on the CLS
Do a Remote Login to the Course Linux Server (CLS) from any existing computer, using the host name appropriate for whether you are on-campus or off-campus. All work in this assignment must be done on the CLS.
Base Directory: Make the CLS Base Directory named
~/CST8177-15W/Assignments/assignment06, in which you will create the files for the following tasks.This CLS
assignment06directory is the Base Directory for most pathnames in this assignment. Store your files and answers in this Base Directory on the CLS.Create the
checksymbolic link needed to run the Checking Program, as described in the section Checking Program below.
Use the symbolic link to run the Checking Program to verify your work so far.
Check your work so far using the checking program symlink.
4.2 The
Processes Script – process_id.sh
- Before you write any scripts, re-read the above section with the title Review of How To Write and Test Scripts.
- The material from last term on Processes and Jobs may be useful.
Using the specifications below, write an executable script named
process_id.sh that shows information about processes that are
owned by a given user name and have a given command name.
Use the Hints below to help you.
The
process_id.shscript must start with the correct Script Header lines.The script takes exactly two arguments. The first is the user name of the process owner, and the second is the command name of the processes to show:
./process_id.shuser_namecommand_name
The script must print zero or more lines containing process information about every process with the given
command_nameowned by the givenuser_name(if any).The script should show only lines for processes owned by the given
user_nameand with the givencommand_name.The script must not show any lines for partial user names such as
rooorootor partial command names such asbasorash. Both names given by the user must match fully in the output ofps.The script must print a Good Error Message and Usage message if it doesn’t receive exactly two command line arguments, and exit with an exit status of
2.The script does not have to validate the user name or produce any error message if no lines of output are generated. Failing to match any processes is not an error.
When your script is working, Document Your Script as you did in the previous assignment.
4.2.1
Examples for process_id.sh
Your output and numbers will differ.
$ ./process_id.sh "$USER" process_id.sh
abcd0001 9170 0.0 0.0 4400 612 pts/2 S+ 10:25 0:00 /bin/sh -u ./process_id.sh abcd0001 process_id.sh
$ ./process_id.sh "$USER" bash
abcd0001 1647 0.0 0.0 26344 2740 pts/2 Ss Oct22 0:00 -bash
$ ./process_id.sh "$USER" sshd
abcd0001 1643 0.0 0.0 90508 1308 ? S Oct22 0:02 sshd: abcd0001@pts/2
$ ./process_id.sh root cron
root 3574 0.0 0.0 19112 860 ? Ss Oct22 0:03 cron
$ ./process_id.sh root sshd | wc -l
10                                          # should find at least two
$ ./process_id.sh oot sshd | wc -l
0                                           # no such user name
$ ./process_id.sh roo sshd | wc -l
0                                           # no such user name
$ ./process_id.sh sshd sshd | wc -l
0                                           # no such user name
$ ./process_id.sh www apache2 | wc -l
0                                           # no such user name
$ ./process_id.sh root s | wc -l
0                                           # no such process name
$ ./process_id.sh sshd root | wc -l
0                                           # no such user or process
$ ./process_id.sh '*' '*' | wc -l
0                                           # no such user or process
$ ./process_id.sh one
./process_id.sh: Expecting two arguments, found 1 (one)
Usage:  ./process_id.sh user_name command_name
$ ./process_id.sh one two three
./process_id.sh: Expecting two arguments, found 3 (one two three)
Usage:  ./process_id.sh user_name command_name
4.2.2
Hints for process_id.sh
The script will use the
pscommand and a pipeline of one or more commands to select only thosepsoutput lines that match the given user name and command name.Refer to your previous assignment work on process listings from Assignment #02: Creating a script
The active part of the script will be one line long (a pipeline). A perfect solution needs only two commands separated by one pipe.
That one line will be preceded by code to check the number of arguments (two arguments), plus some lines for the Script Header. As with many one-line scripts, the code needed to check the arguments greatly exceeds the code that does useful work!
Do not use any options to
psthat show all processes! You cannot easily search the resulting output for a command name.Use only the two
psoptions described next:- The
pscommand has a useful option to display only processes with a particular command name. Using this option to select only lines that contain that command name makes the script much simpler, since otherwise it is tricky to usegrepto match a command name in the middle of a line ofpsoutput. If you don’t use this option topsyou must select the command name carefully by choosing some surrounding context from the output lines usinggrep. I recommend using thepsoption, notgrep. - In addition to the option that selects command name, you will
need an option to make
psgenerate a user name at the start of every output line. See the man page for either the full-format or user-oriented output format. Once you makepsselect lines that have the right command name, usinggrepto select lines containing only the correct user name is easy since the user name field can always be matched as anchored at the start of every line. Do not match any user name that might occur later in the line. Do not match partial user names, e.g.rooorwww.
- The
Do not use the
psoption that searches for a user name: You cannot combine the abovepsoption that searches for a command name with apsoption to also search for a user name, since the result will be processes that match a command name or that match the user name, not processes that match both. Use only the above twopsoptions in your solution.Make sure that when you search for a user name in the output of
psthat you use a pattern that ensures that the entire user name is matched and not just a prefix or a suffix. The script must not show any lines for partial user names such asroooroot.Do not print lines from
psthat look like command names. Carelessly written scripts will incorrectly print thegrepcommand that is being used to select the rightpsoutput line inside the script; don’t do that. Show only the required output. (If you use the correctpsoptions, you won’t have this problem.)Test your script and verify that all the Examples work.
Run the Checking Program to verify your work so far.
4.3 A Signal
Trap Test – signaltrap.sh
Let’s use the above script to find a process and then send it some signals.
We are going to be running a shell background process for this test. Normally, the shell won’t tell you anything about your background processes until you push the Enter key and get a shell prompt. To get immediate notification, set the
notifyshell option as described in last term’s Login and Shell Startup Files.
signaltrap_output
- First, we need to run a test process to receive the signals: Run the
script
signaltrap.shwhich is located in the Source Directory. You’ll notice this script starts and doesn’t finish – it just sits there doing nothing, and you don’t get yourbashprompt back because the script isn’t finished yet. Thebashprompt won’t appear until the script process is finished, killed, or stopped.- The script creates a log file in the current directory named
signaltrap_output. Do not delete this log file.
- The script creates a log file in the current directory named
- Type
^Cto try to interrupt this script process.- Recall that typing
^Cat a keyboard sends the foreground process anINT(interrupt) signal. Most processes die when they receive an interrupt signal. - Notice that the
signaltrap.shprocess did not do the normal thing (die) upon receiving theINTsignal. It “caught” the signal, printed and logged a message, and refused to die.
- Recall that typing
- Type
^Zat the keyboard to send aSTOPsignal to thesignaltrap.shprocess.- You will get your
bashprompt back and see a message about the process beingStoppedby the signal. - The shell built-in
jobscommand will list this as aStoppedprocess.
- You will get your
- Use
bgto resume the script process running in the background.- The process will resume, but the shell will not wait for it to finish. You get your shell prompt back and can enter other commands while the background process runs.
- Use your
process_id.shscript from above to find the process id of this background script process.- Be sure your script finds your process, not any other process!
- If your
process_id.shscript can’t findsignaltrap.shyou may need to adjust it to find commands that are shell scripts. (This may be tricky if you aren’t using thepsoption described in the Hints for the./process_id.shscript.)
- At your command prompt, send the
signaltrap.shscript process aTERMsignal (terminate) and notice that this too didn’t make the process do the expected terminate action (clean up and die).- The script traps and does not die on many signals. You can read the
script to see which ones are handled with
trap. - Read the messages that the script writes into its log file.
- The script traps and does not die on many signals. You can read the
script to see which ones are handled with
- Finally, send the
signaltrap.shprocess aKILLsignal.KILLsignals can’t be ignored, so it should be gone – verify this.- The shell built-in
jobscommand will show that the process is gone. - Do you know why the script didn’t write a log message when it received
the
KILLsignal?
- Find a
PIDof any process owned byrootor by another user, and try sending it aKILLsignal (or any other signal).- You will see an
Operation not permittederror message. - Regular users cannot kill (send signals to) other users’ processes.
- Re-run the command and append the error message to the
signaltrap.shlog file, below all the other log messages. Do not accidentally erase the messages in the log file! - Verify that the log file contains several log messages and ends with the above error message as the last line.
- You will see an
- When your script is working, Document Your Script as you did in the previous assignment.
Run the Checking Program to verify your work so far.
4.4 The
Temperature Script – temperature.sh
- Before you write any scripts, re-read the above section with the title Review of How To Write and Test Scripts.
- The material from last term on Examples of Pipes may be useful.
Using the specifications below, write an executable script named
temperature.sh that extracts the current Ottawa Temperature from
the appropriate Environment Canada XML RSS page. Use the
Hints below to help you.
The
temperature.shscript must start with the correct Script Header lines.The script will accept no arguments.
The script will print one line containing the current Ottawa Temperature, e.g.
Temperature: 6.4°CThe script must print a Good Error Message and Usage message if it receives any command line arguments, and exit with an exit status of
2.
otemp
Create a hard link to the
temperature.shscript in your ownbin/directory and name the linkotempVerify that you can now type simply
otempat a shell prompt to have the one line of current temperature display.- If this command isn’t found, perhaps you haven’t set your
PATHin your.bashrcas required in Section 4.3 of Assignment #02?
- If this command isn’t found, perhaps you haven’t set your
When your script is working, Document Your Script as you did in the previous assignment.
4.4.1
Examples for temperature.sh
Your output will differ.
$ ./temperature.sh
   Temperature: 6.4°C
$ otemp
   Temperature: 6.4°C
$ ./temperature.sh one two three
./temperature.sh: Not expecting any arguments, found 3 (one two three)
Usage:  ./temperature.sh
$ otemp one two
/home/abcd0001/bin/otemp: Not expecting any arguments, found 2 (one two)
Usage:  /home/abcd0001/bin/otemp
4.4.2
Hints for temperature.sh
Start by building up the working command pipeline on your interactive command line. Get it working on the command line before you copy the working pipeline into your shell script.
Refer to last term’s work with pipes and web pages shown in CST8207 Examples of Pipes and scroll down to the Display current Ottawa weather temperature example that fetches the temperature using an
elinksalias and the Environment Canada XML RSS feed.As shown in the above example, use the text browser
elinkswith the given options (reproduced below) to retrieve the current Ottawa temperature from the given XML RSS feedURL:elinks -dump -no-numbering -no-referencesURL- The
URLshould be the Ottawa XML RSS feed as shown in the above example. - Make sure you can fetch the entire RSS feed web page
before continuing with the next steps. If you see “Host not found” or “Page
Not Found”, you have got the wrong
URL. - In a script, always use the full
elinkscommand and arguments in the pipeline, not a shell alias. Shell aliases may make the script harder to read.
Pipe the working
elinksoutput intofgrepto extract the line containing the text stringTemperature:from the XML RSS page.- The pipeline will print one line of current temperature from the XML
RSS page, e.g.
Temperature: 6.4°C - You should see only the one line of temperature output on your
screen when you have the right
fgrepcommand line. - Don’t use a shorter
fgreppattern, e.g. “Temp”, since that might match other lines in the RSS output some day, e.g. “Abnormal Temperature Trend”.
- The pipeline will print one line of current temperature from the XML
RSS page, e.g.
Put the above working two-command pipeline into a script named
temperature.shthat prints out the current temperature for Ottawa.- The active part of the script will be one line long (a pipeline).
- A perfect solution needs only two commands separated by one pipe.
- Do not use any shell aliases.
That one active line should be preceded by code to check the number of arguments (zero arguments), plus some lines for the Script Header.
- As with many one-line scripts, the code needed to check the arguments greatly exceeds the code that does useful work!
Do not create or use an
aliasin your script; use the fullelinkscommand line with the correctURL.- Scripts never use aliases, since aliases are meant to save typing by humans, not by scripts, and aliases make scripts harder to read.
If a
URLcontains shell meta-characters, such as?, you must quote theURLto prevent GLOB expansion by the shell..- Hide all special characters in the
URLfrom the shell.
- Hide all special characters in the
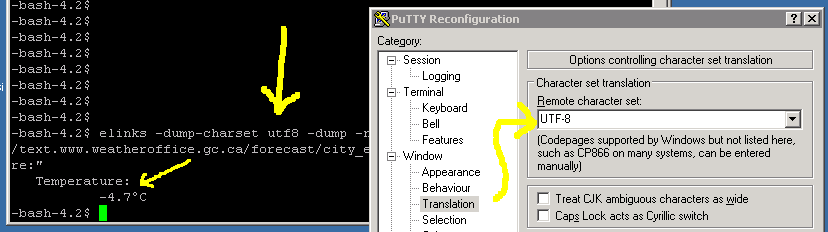
elinksdefaults to fetching pages using the UTF8 character set, which may not display well on your screen.- You can change the character set using the
elinks-dump-charsetoption followed by the name of a new character set. (Try the namesascii,latin1or the defaultutf8.)
- You can change the character set using the
If the degree special character between the temperature number and the letter
Cdoesn’t display correctly under Windwos (e.g.6.4°C), you may need to reconfigure PuTTY for the UTF8 character set. (Remember to save your PuTTY settings.)Test your script and verify that all the Examples work.
Run the Checking Program to verify your work so far.
4.5 Sending
information using a mail command –
mail_temperature.sh
System administrators often have systems send them automated EMail. You will build a script that uses EMail to send you the Ottawa temperature. (You can optionally send the temperature to your mobile phone.)
- There are many text-mode EMail clients (“Mail User Agents”) for Linux. This assignment uses the one named
- Optional: If you are interested in trying a power-user text-mode mail client for everyday interactive use, try
muttand readman mutton the CLS.
- Learn about EMail
on the CLS, skim over the man page for the
mailcommand, and try sending yourself EMail from the CLS to your own EMail account using this pipeline:$ echo "Testing mail" | mail -s "Test"abcd0001@algonquinlive.com$ who | mail -s 'See who list'abcd0001@algonquinlive.com- Replace the
abcd0001with your own Algonquin Live EMail address, or use your own personal EMail address instead. - You can pipe any text standard output into the
mailprogram; try replacing the command on the left of the pipe withlsordateor any command that generates standard output that you can redirect. - Do not send binary data this way; it won’t work. Text Only
- You can use a similar command to send EMail to any of your other EMail accounts.
- Following the above syntax, EMail the one line of standard output of your
above
temperature.shweather script to your Algonquin EMail address with the subject:Current Ottawa Temperature- If the degree special character between the temperature number and the
letter
Cdoesn’t display correctly in your EMail (e.g.6.4°C), read the Hints above about option-dump-charset.
- If the degree special character between the temperature number and the
letter
- Create a script called
mail_temperature.shthat will use yourtemperature.shscript and the above EMail syntax to send the current Ottawa temperature to your Algonquin EMail address. (Use the working command line from above.)- The active part of the script will be one line long (a pipeline). A perfect solution needs only two commands separated by one pipe. Use pipes; do not use any output or input temporary files.
- That one line will be preceded by code to check the number of arguments (no arguments), plus some lines for the Script Header. As with many one-line scripts, the code needed to check the arguments greatly exceeds the code that does useful work!
- The script will use an absolute pathname to your existing
temperature.shscript to generate the one line of temperature data for the script pipeline. - Do not duplicate the
elinksline inside this new mail script; your new script must EMail the output created by running yourtemperature.shscript (that contains theelinksline). - You can create this script correctly even if you have not got a working
temperature.shscript. (Of course, you won’t be able to fully test it without a workingtemperature.shscript.)
omt
- Create a hard link to the
mail_temperature.shscript in your ownbin/directory and name the linkomt(Ottawa Mail Temperature).- Verify that you can now type simply
omtat a shell prompt to have the temperature sent to you by EMail. (If this command isn’t found, re-read the note aboutPATHabove in the temperature script section.)
- Verify that you can now type simply
- When your script is working, Document Your Script as you did in the previous assignment.
Run the Checking Program to verify your work so far.
- Optional: You can try finding and using an SMS Gateway List to find the EMail address of your SMS enabled phone, and EMail any text message from the CLS directly to your phone. (May be subject to length restrictions and incur an arbitrary delay.)
- If the degree special character between the temperature number and the letter
Cdoesn’t display correctly in your EMail (e.g.6.4°C), read the Hints above about option-dump-charset.
4.6
Scheduling repeated tasks with crontab
You may find last term’s notes Crontab and At Jobs useful here.
The
crontabcommand is used to create tasks that are run repeatedly by the systemcrondaemon program. These are commonly calledcronjobs. You can create personalcronjobs. There is also a system file containing systemcronjobs that only the super-user can edit.
If you don’t redirect all the output of command lines used in a
cron job, any output will be sent to you by EMail. You will need
to use the mail program to read the EMailed output generated by
your cron jobs. Learn about EMail
on the CLS.
Read the course notes and the skim the man page for the
crontabcommand. You may find last term’s notes Crontab and At Jobs useful here.Run the CLS command
select-editorto choose a text editor for use by thecrontabcommand. (Isn’t it time you learned somevim?)Run
crontab -eto start the selected text editor to edit your personalcrontabfile.- Your personal
crontabfile opens in the text editor with a list of helpful comments, but no actual commands are scheduled. - Use the text editor to add valid
crontabcommands to the bottom of the file, below the comments. The commands you add will not take effect until after you save the file and exit the text editor. - Experiment by creating a
crontabline that runs in the near future to make sure you know howcronjobs work: e.g. create acrontabline that runs thedatecommand every minute, save, and exit. Wait a minute for the command to execute. - See the note above about where the
dateoutput will be sent. Learn about EMail on the CLS. - Use the
crontabcommand again to edit and experiment with other validcrontablines that run in the near future, e.g. two minutes from now, etc. - Use the
crontabcommand to remove the test commands from your personalcrontabwhen you know enough about how to create workingcronjobs.
- Your personal
Now, create a
crontabline designed to run youromtprogram (located in yourbin/directory) at The Crontab Time.- Use a relative pathname to run your
omtprogram in yourbin/directory. - Testing: Create and save your
crontabusing times in the near future while you are testing yourcronjob to make sure it works. - When you know your job works in the near future, change the time to be exactly the time required for marking.
- You can create this
crontabfile correctly even if you have not got a workingomtscript. (Of course you won’t receive the correct output without a workingomtscript.)
- Use a relative pathname to run your
Use the
crontabcommand with option that lists the contents of your current livecrontabfile. Make sure your displayedcronjob is scheduled at The Crontab Time.
omt.crontab
- Repeat the above command and redirect the contents of your current live
crontabfile into anomt.crontabtext file in the Base Directory. (It should contain one validcrontabline at the bottom of all the comments.)
In your cron job, did you use a relative path to the
omt script name (the name that is located in your own
bin/ directory)? You need to know in which directory the
cron job runs, to create the correct relative path to the
program in your bin/ directory.
Run the Checking Program to verify your work so far.
4.6.1 The Crontab Time
How to calculate your personal crontab time for use in cron and at jobs.
- Take your 9-digit student number and remove the first three digits (probably
040), leaving six digits. Use these six digits as follows:- Take the first two of those six digits as a number, modulo 12, and then add 1, giving a number between 1 and 12. This is your month number.
- Take the next (middle) two of those six digits as a number, modulo 24, giving a number between 0 and 23. This is your hour number.
- Take the last two of those six digits as a number, modulo 60, giving a number between 0 and 59. This is your minute number.
- Take the same last two of those six digits as a number, modulo 28, and then add 1, giving a number between 1 and 28. This is your day-of-the-month number.
For example, if your nine-digit student number were
123456789, the last six digits would be 45 67 89 and:
- the month would be
(45%12)+1 = 10 - the hour would be
67%24 = 19 - the minute would be
89%60 = 29 - the day of the month would be
(89%28)+1 = 6
Example result for student number 123456789: October 6 at
19h29 (7:29pm).
4.7
Scheduling a command once with at
You may find last term’s notes Crontab and At Jobs useful here.
The
atcommand is used to create a task that runs only once at some future date and time. These are commonly calledatjobs. There is no system file ofatjobs, since these jobs only run once.
If you don’t redirect all the output of command lines used in an
at job, any output will be sent to you by EMail. You will need
to use the mail program to see the EMailed output generated by
your at jobs. Learn about EMail
on the CLS.
- Read the course notes and skim the man page for the
atcommand and note the syntax used to schedule anatjob at a time and date in the future. Experiment with someatcommand lines that run in the near future to make sure you know how it works. You may find last term’s notes Crontab and At Jobs useful here. - Use the
atcommand to schedule a run of youromtprogram (located in yourbin/directory) at The Crontab Time in the year 2016.- Use an absolute pathname to your
omtprogram in yourbin/directory. - Testing: Experiment with times in the near future while
you are testing the
atcommand to make sure it works. - When you know your job works, change the time to be exactly the time required for marking.
- You can create this
atjob correctly even if you have not got a workingomtscript. (Of course you won’t receive the correct output without a workingomtscript.)
- Use an absolute pathname to your
- Learn the command that displays a list of your scheduled
atjob numbers and display the list to make sure your job is scheduled to run at The Crontab Time in 2016.
In your at job, did you use an absolute path to the
omt script name (the name is located in your own
bin/ directory)?
4.7.1
Viewing scheduled at jobs
You may forget what command is scheduled in a job. What is the command
syntax to show you the content of a scheduled at job,
not just the job number? (NOTE: The command that lists all your
at job numbers is not the same as the command that
shows you what the content of the job actually is!)
In other words, use a command to display the actual command line that you
submitted when you created the at job, along with all the
environment information that the system adds to your at job.
atjob.txt
- Using the command above, display the full content of your 2016
atjob and redirect it into fileatjob.txtin your base directory. The file should start with a shebang line and contain about 30 lines (approximately), most of which are variable assignment statements.
Usually we don’t care to see all the environment information at the start of the queued
atjob file. Assuming that the command being run byatis only one line long (as it is for our 2016 job), you can show only the one-line command line itself on your screen and not see all of the associated shell environment that is created as part of the job by piping the output into a command that shows the last lines of input.
Run the Checking Program to verify your work so far.
4.8 When you are done
That is all the tasks you need to do.
Read your CLS Linux EMail and remove any messages that may be waiting. See Reading eMail for help.
Check your work a final time using the Checking Program below and save the standard output of that program into a file as described below. Submit that file (and only that one file) to Blackboard following the directions below.
When you are done, log out of the CLS before you close your laptop or
close the PuTTY window, by using the shell exit command:
$ exit


