Updated:
2017-06-20 09:03 EDT
Overview of the VI/VIM text editor
It took about a month before I could do anything with any proficiency in vi and I still didn’t love it, but by then I’d realized that there was an insanely powerful editor hiding behind this bizarre facade. So I stuck with it, and eventually found out that once you know what you’re doing, it’s an incredibly fast editor. […] I never hated any editor as much as I hated vi, and now I’ve stuck with it for 17 years because I can no longer imagine a better editor. http://opensource.com/business/16/8/7-reasons-love-vim
- VI/VIM is the Universal Unix/Linux/BSD/OSX text editor – every Unix and Unix-like system has it. Even your home router may have a version installed (e.g. DDWRT, OpenWRT).
- The VI/VIM editor is notoriously hard to learn, but once learned, is very easy to use.
- VI/VIM is a pure (plain) text editor – just text, no fonts, no formatting. It will not edit word-processing documents such as MSWord or OpenOffice or printer-ready documents such as PDF files.
- In its simplest form, VIM is a keyboard-based, character-based editor. It does not use a GUI window or a mouse. Everything is done using the keyboard. (Put your mouse away; you won’t have one at a server text console.)
- VIM is a moded text editor; you need to know what mode the program is in before you can start typing text into it. When VIM starts, it treats your keyboard as a command device and every letter you type is a VIM command. (VIM is a poor editor to use if you have cats; the cat walking across your keyboard can change your file in fifteen ways.)
Versions of VI/VIM
The stock Unix vi and the open-source vim (and various other clone editors such as neovim, nvi, elvis, and stevie) are all based on the original 1980’s Berkeley vi program written by Bill Joy (the same guy who wrote the C Shell).
- On Linux machines,
vi and vim are often the same program (vim). One is usually a link or symbolic link to the other.
- Some versions of Red Hat / Fedora / CentOS install different versions of
vi under different names. Use vim to get the one with the most features.
Some systems (e.g. Ubuntu) install a “light” version of vim as a default; you have to ask to install the full version after installation. You may find that some of the features described in a textbook only work on a full installation of vim (e.g. the “Getting Help” commands).
I will refer to the editor using its traditional name vi – you should always interpret this to mean modern vim, not the old Unix vi editor.
Learning the VIM Text Editor
VIM is an easy-to-use but hard-to-learn text editor. It doesn’t need the X Windows GUI system to be running; you can use it over a serial line and a dial-up modem. Even your home router may have a small version of VIM built in (e.g. OpenWRT)!
Online VIM Tutorial – vimtutor
- On most Linux/BSD machines, the VIM editor comes with a short online tutorial command
vimtutor available in several languages.
- Set your terminal window to 25 lines by 80 characters and try typing
vimtutor at a shell prompt.
- You can sometimes get the tutorial in French by typing
vimtutor fr and in Spanish by typing vimtutor es.
- The versions of the tutorial in non-English languages may be much older than the English versions. Use the English version for the latest tutorial.
- Other languages may be available.
- You might still be able to find the tutorial even if the
vimtutor command is not installed. Look around.
VI and VIM Reference Cards
You can find good “cheat sheets” on VI by searching on the Internet for “vi editor cheat sheet” or “vi editor summary pdf” or “vi reference card”.
- Here is the Recommended Reference card (front only) written by Donald Binder and updated by Ian! Allen:
I’ve edited the front side to make some of the text clearer and to add some missing “essential” commands such as ^R (redo).
Other Tutorials
You may find these useful. URLs come and go; but, these were working at one point:
What to Learn First
The vimtutor tutorial teaches you the basics.
You can get by in VI with knowing how to read in a file, delete and append single characters and lines, and write the file back out. (See the list of “bare minimum” commands, below.)
The more you learn about VI, the faster you will edit files and the better your mark will be on tests and exams. VI skill is essential to you as a Unix programmer; it is now the universal Unix editor.
Almost every letter, upper and lower case, is a VI command. The more you learn, the faster you can edit. While you may begin by learning to delete a word slowly using ten x commands, eventually you should evolve into knowing how to use the single quick dw command.
See below for the location of the online VIM tutorial.
Arrow Keys slow you down
Stay out of insert mode!
Do not use the arrow keys to move the cursor – use the command-mode letters h,j,k,l instead. The letters don’t require you to move your hands from the home row on your keyboard, and they encourage you to remain in command mode where you can use all the VIM commands. Arrow keys will slow you down and make you look like an amateur.
Setting VIM Options – Getting Help
VIM comes with hundreds of options that influence how it works. You can set the options at any time; but, to save them and have them used every time you start VIM, you need to put commands into a file named .vimrc in your HOME directory.
Essential options
The following are good options that you should set in your .vimrc file, if VIM does not already have them set for you:
$ cd                    # go to my HOME directory
$ cat .vimrc            # see what is in the file already, if anything
$ echo "set showcmd showmode confirm ruler" >>.vimrc
$ cat .vimrc
set showcmd showmode confirm ruler
The above shell command line appends the options to your .vimrc file. You only need to do this once; VIM will read the file on start-up. If you execute the above command more than once, you will put multiple copies of the options into the file. This isn’t an error; but, it isn’t necessary either. Edit the file and remove the duplicate lines.
Getting help (with options)
The full vim editor has help available by typing :help, e.g. you can type :help showcmd. This splits your terminal screen and opens up a help file inside vim. To close the help file, just do :q as you would do to close any open file.
Some people also like to have options set number and set spell in their .vimrc.
Options for dark screens (e.g. PuTTY)
If you use a terminal emulator with a dark background (e.g. PuTTY), you will find that VIM chooses poor colours for syntax highlighting. In particular, comment lines (starting with hashtag #) are shown as an unreadable dark blue colour on black.
You can tell VIM to use a different colour scheme for dark terminal backgrounds using either of these commands (which can be put in your .vimrc too). Pick one or the other:
:set background=dark
:colorscheme desert
Note the American spelling of color. You can get direct help on the colorscheme command inside VIM, and you can get help on the set command inside VIM and search for background in the set help page.
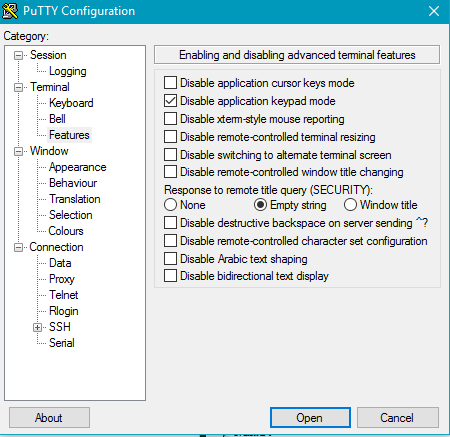
Enable your keypad
If you find that your keypad doesn’t work properly inside VI, try turning off “Application Keypad Mode” in your terminal program. In the PuTTY terminal program, you do that under Terminal, Features, Disable application keypad mode: screenshot
Avoid wrapping of long lines: 80 columns max
When you edit a file containing a line of text longer than the width of your VIM window, the long line of text will usually “wrap around” to the beginning of the next line, and keep wrapping onto following lines if the line is really long. One long line will appear to be many lines.
A wrapped line of text is still one line in the file and in the editor; it simply displays as multiple lines on your screen. When you delete the one line, the entire line disappears, including all its wrapped parts.
(You can optionally tell VIM to only display the part of the line that fits in your terminal window, so that you have to scroll to the right to see the rest of the line.)
Because wrapped lines are messy to look at on your screen – it’s easier when every line on the screen is really one line in the file – avoid writing long lines of text. For historical reasons (the number of characters on a punch card!), a line length of no more than 80 characters is still fairly standard. Keep your lines shorter than 80 characters. (VIM can display a column number in it status line.)
- Longer lines will wrap around the screen; they are still one line.
- Don’t write lines longer than 80 characters.
Absolute bare minimum basic VI commands
Look up the meaning of these VI/VIM commands on your reference sheet:
ESC
a i x dd
h j k l
:help
:r file
:w file
:q
:q!
The above commands will perform most any edit on any file you have. All the other things in VI simply make the editing faster and get you better marks (and a better job) in less time. Any job interview will ask you to edit a file and watch how proficient you are at making changes.
Some of the other VI commands make the editing much, much faster. Compare dd (delete a whole line) with typing 80 x commands, or :1,$s/idallen/alleni/g to replace every occurence of idallen with alleni in the whole file using a single global search and replace!
What to learn Next in VI
Use any of the online tutorials to learn more.
Other useful things to know in VI, in vague order of importance:
u ^R                     -- undo and redo
p P                      -- put (after yank or delete)
/search string           -- search for pattern in file
.                        -- repeat last change
r                        -- replace one character
o O                      -- start a new, empty input line
5dd 10x                  -- repeat counts on most commands
0 ^ $ H L M              -- position cursor on screen
A I                      -- insert text at end/start of line
U                        -- undo all changes on current line
cc s                     -- change current line, current char
f F                      -- move forward/backward to character
!!                       -- pipe text into any Unix command
:1,$s/pattern/new text/g -- global search and replace
:set showcmd             -- show partial commands in status line
:set showmode            -- show INPUT mode
:set confirm             -- ask before quitting modified buffer
:set ruler               -- show current file position
:set autoindent          -- auto-indent lines of code
:set wrapmargin=5        -- wrap input text at column 75
:set number              -- show buffer with line numbers
:syntax off              -- turn off syntax highlighting
:$r file                 -- read file in at end of buffer
:$r! program             -- read output of executing program
The VIM tutoral has details on many of these commands.
Using VIM over a remote connection
This section is only for people using VI/VIM over a remote connection. If you use VI/VIM in a Linux terminal window, things usually work fine.
Make sure your terminal is correctly configured before you enter VI remotely! The VI/VIM editors must know how to drive your terminal during an edit session; if you see anything about an “unknown” terminal type when you start up the editor, you must exit immediately and fix the terminal type to be one that VI/VIM recognizes.
Be careful when you resize a window containing a VI/VIM session. A remote session of VI on another machine may not pick up the new window size, and what you see on your screen may get garbled. (If this happens, quit VI, type “resize” at the shell prompt, and restart VI again.)
To be safe, do not change the size of a VI/VIM window when the editor is open in a remote window.
If you use telnet/PuTTY from under Windows to connect to a Unix machine, make sure you have NO SCROLL BARS VISIBLE in your telnet window! Set the correct number of lines and correct terminal type when you start telnet, and don’t change them. (This won’t be a problem for people working from a Unix machine, since Unix is good about passing the window size to VI.)
The “resize” command is useful to set the number of lines correctly after you use telnet or ssh to connect to the remote machine:
$ resize
Finding a missing vimtutor VIM Tutorial
If the command vimtutor doesn’t work, you will have to locate and copy the tutorial file yourself. On most Unix/Linux machines, you will find the tutorial somewhere under the directories /usr/share/vim* or /usr/local/share/vim*, e.g. possibly /usr/share/vim/tutor/tutor. Different Unix systems put the tutorial in different places; go look for the file named tutor under the above places.
The VIM tutorial is a file named tutor under directory /usr/share/vim/vim63/tutor/ on Fedora 12 and under /usr/share/vim/tutor/ on most Linux systems.
The vimtutor command startes up VIM on a fresh copy of the tutorial file. If you are not using vimtutor, you must copy the tutorial file into your own directory first:
$ cd
$ cp /usr/share/vim/tutor/tutor tutor     # use the actual pathname!
$ vim tutor
Use the actual pathname to the tutor file on your system. Follow the instructions in the tutorial.
The VIM tutorial was written to be used under various operating systems, including MS-DOS; so, it has one or two MS-DOS specific external commands in it (e.g. there is no DEL command in Unix – use rm instead!). Also, if you have set ruler turned on, the Ctrl-g command will not show your current line number; because, the ruler line already shows it for you.
Author:
| Ian! D. Allen, BA, MMath  -  idallen@idallen.ca  -  Ottawa, Ontario, Canada
| Home Page: http://idallen.com/   Contact Improv: http://contactimprov.ca/
| College professor (Free/Libre GNU+Linux) at: http://teaching.idallen.com/
| Defend digital freedom:  http://eff.org/  and have fun:  http://fools.ca/
Plain Text - plain text version of this page in Pandoc Markdown format


