On paper, you will miss updates, corrections, and hints added to
the online version.
On paper, you cannot follow any of the hyperlink
URLs that lead you
to hints and course notes relevant to answering a question.
On paper, scrolling text boxes will be cut off and not print properly.
Due Date: 23h59 (11:59pm) Friday February 8, 2019 (end of Week 5)
You have over two weeks to do this assignment because you need get
together with friends in a study group and do two worksheets first.
Do the worksheets first and check your answers with your classmates.
Your next assignment will be available in a few days and will
overlap this assignment. Start work on this now! Don’t delay!
Late assignments or wrong file names may not be marked.
Please be accurate and punctual.
An ability to READ ALL THE WORDS to work effectively.
Deliverables
One plain text file uploaded to Brightspace according to the
steps in the Checking Program section below.
Use Remote Login to connect to the Course Linux Server
(CLS) and use commands in The Unix/Linux Shell to
create directory structure and files for marking on the CLS. Do not delete any assignment work from the CLS until after the
term is over!
WARNING: Some inattentive students upload Assignment #03 into the
Assignment #02 upload area. Don’t make that mistake! Be exact.
These worksheets prepare you to do the rest of the tasks listed below.
Failure to complete the worksheets will make the rest of this assignment
very difficult. Do the worksheets first! Record and save all your
worksheet answers for study and quizzes!
You must download Libre Office (or Open Office) for Windows to edit the
Worksheet *.odt files and save your answers. (Or you can print the
PDF and write your answers on paper.) Do not use Microsoft Word;
it will mangle the numbering and format of the worksheet.
Do the tasks in order, from top to bottom.
Do not skip steps. Most tasks are independent, but some depend
on successful completion of a previous task.
READ ALL THE WORDS in each task before you begin the
task, especially all the Hints and links.
Verify your own work before running the Checking Program.
You won’t have a checking program at your job interview and
the Checking Program is not guaranteed to check everything.
Run the Checking Program at the end of the task to grade your
work and help you find some of your errors. A perfect mark from
the Checking Program does not mean your answers are correct.
When you are done with this Assignment, submit the output of the
Checking Program to Brightspace before the due date, following
the directions given at the end of this Assignment.
You can use the Checking Program to check your work after you
have completed each task.
Most task sections below require you to finish the whole task section
before running the Checking Program. You may not always be able
to run the Checking Program successfully in the middle of a task
or after every single task sub-step. The assignment tells you where
you can safely check your work.
You will create file system structure in your CLS home directory
containing various directories and files.
When you are finished the tasks, leave the files and directories in
place on the CLS as part of your deliverables for your instructor
to verify.
Assignments may be re-marked at any time on the CLS; you must have
your term work available on the CLS right until term end. Do not
delete any assignment work until after the term is over!
You can modify your work and check it with the Checking Program
as often as you like before you submit your final mark to Brightspace.
You can upload your marks to Brightspace as many times as you like
before the due date. Partial marks are accepted.
Your instructor will also mark on the due date the work you do in your
account on the CLS. Leave all your work on the CLS and do not modify
it after you have submitted your final mark to Brightspace.
You must keep a list of command names used each week and write down
what each command does, as described in the List of Commands You
Should Know. Without that list to remind you what command names to
use, you will find future assignments very difficult.
All course notes are available on the Internet and also on the CLS. You
can learn about how to read and search these CLS files using the command
line on the CLS under the heading Copies of the CST8207 course notes
near the bottom of the page Course Linux Server.
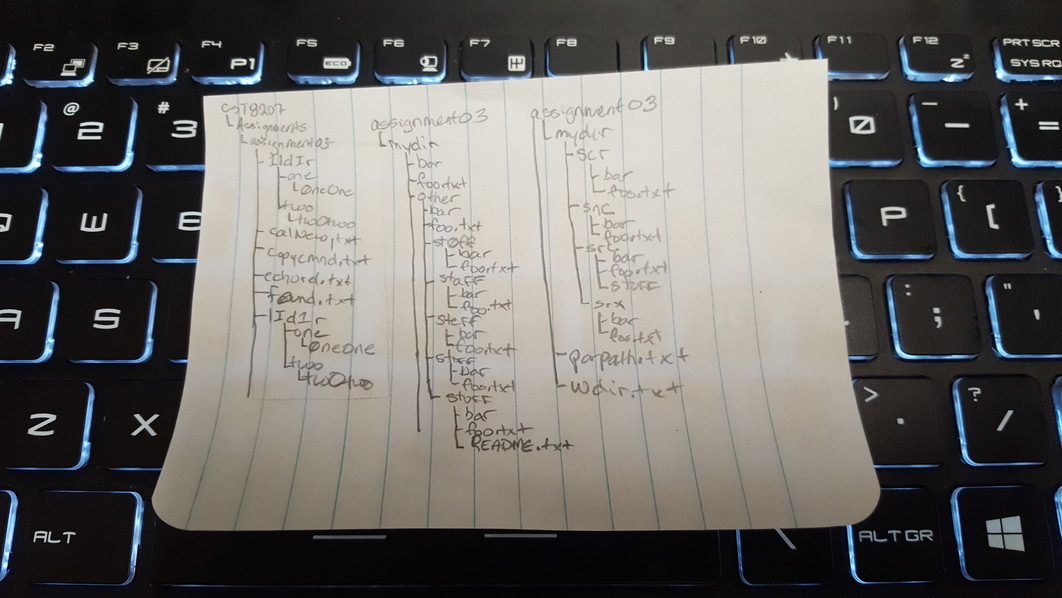
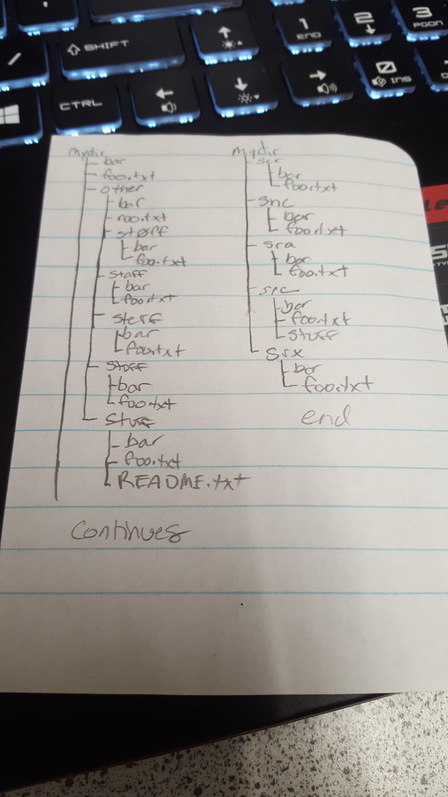
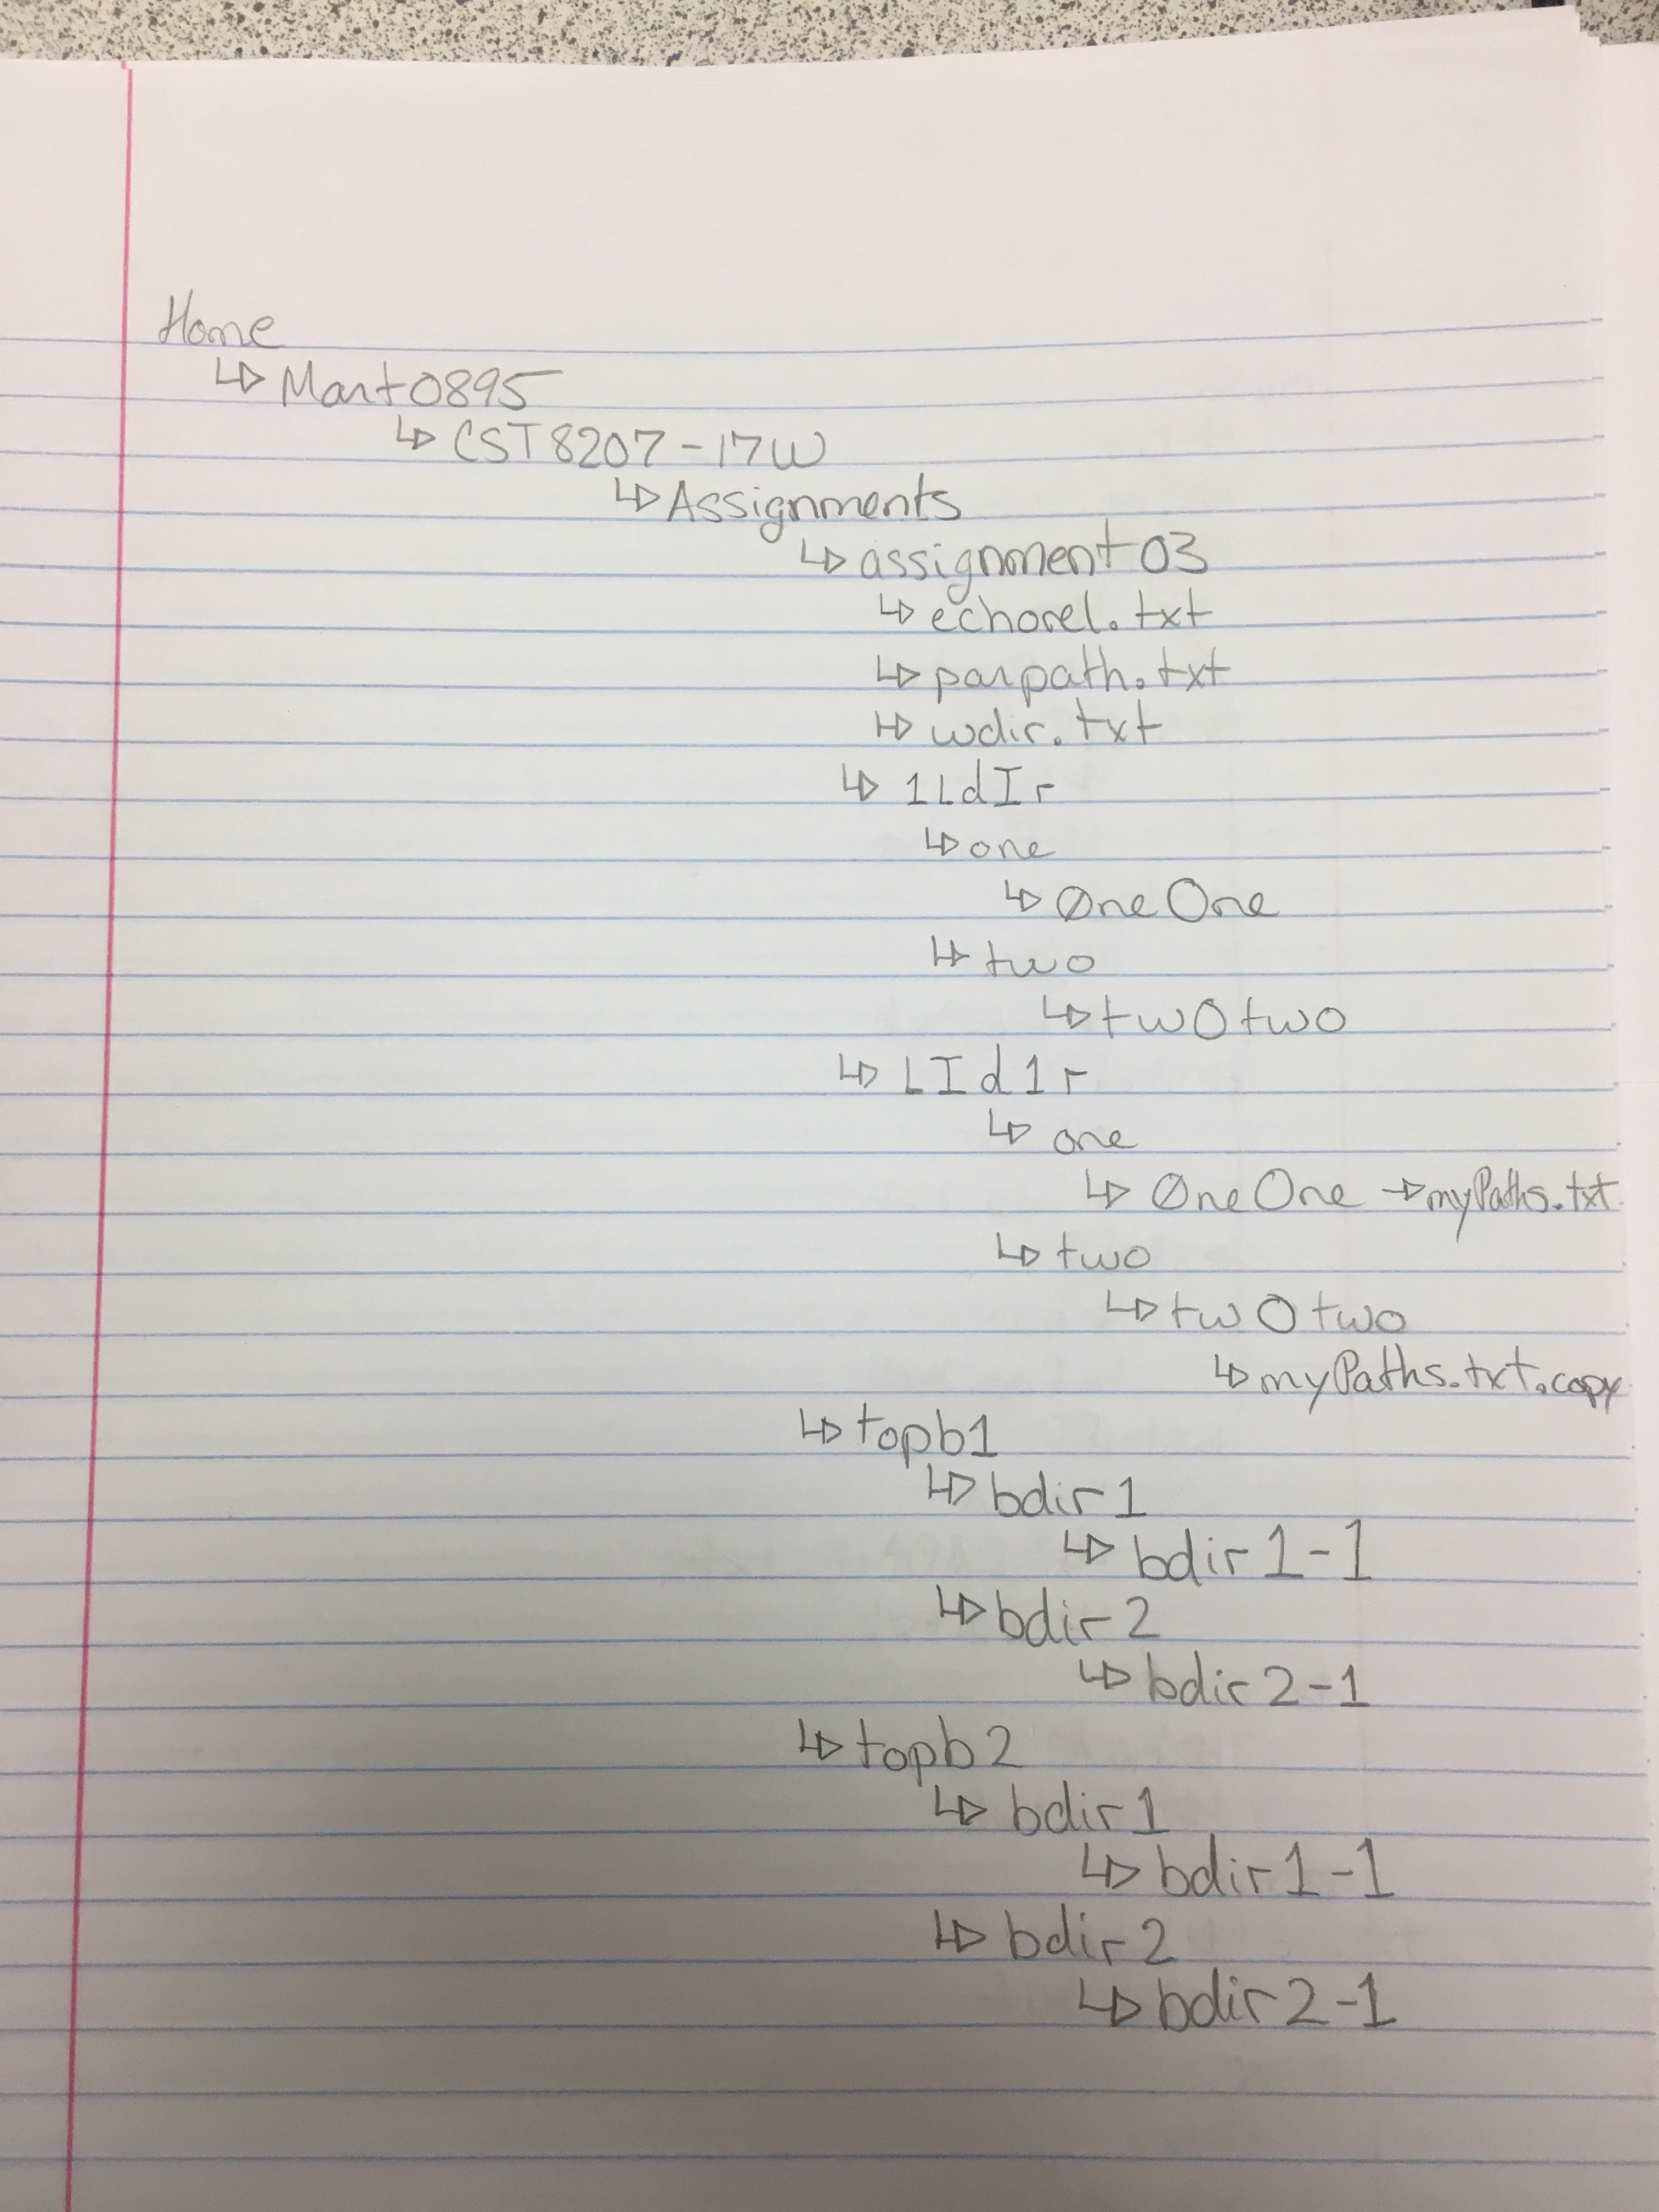
Many students find it extremely helpful to draw a quick graph/picture
of their file system directory structure on paper before attempting to
answer questions about relative pathnames.
You need to be able to visualize the relative locations of names in
the file system tree to answer these questions. Draw the trees on
paper!
All references to the Source Directory below are to the CLS directory
~idallen/cst8207/19w/assignment03/ and that name starts with a
tilde character ~ followed by a user name with no intervening slash.
The leading tilde indicates to the shell that the pathname starts with
the HOME directory of the account idallen (seven letters).
You do not have permission to list the names of all the files in the
Source Directory, but you can access any files whose names you already know.
Do a Remote Login to the Course Linux Server (CLS) from any
existing computer, using the host name appropriate for whether you
are on-campus or off-campus.
All work in this assignment must be done on the CLS.
Using the PS1 variable syntax shown in Section 2 of Worksheet #02 HTML,
set your shell prompt to include your user name, your computer name,
and the basename of your current working directory. (See the
definition of basename in the File System and Pathnames class notes.)
Your shell prompt should look similar to this:
[abcd0001@idallen-ubuntu ~]$
Set your PS1 prompt every time you log in to the CLS, so that
the prompt changes to tell you you the basename of your current
working directory. This is faster than typing pwd all the time!
You will learn later how to create a .bashrc file to make this
happen automatically every time you log in to the CLS.
PS1 Tip Feature: If you use \w instead of \W in the PS1
prompt string, the shell will display the full absolute path of your
current working directory instead of just the basename. You may or
may not like this feature; it doesn’t leave much room on the command
line to type commands without having the command line wrap around
to the next line. You choose.
PS1 Tip Feature: You may omit using the \u and \h strings in the
prompt, leaving only \W. This will make your prompt shorter.
You choose.
Create the following directory structure in your CLS personal HOME
directory and record (for study purposes) the series of Unix commands
you used to create it. (You do not have to create any directories
that you have already created in a previous assignment.) Spelling
and capitalization must be exactly as shown:
Create the CST8207-19W directory in your CLS HOME directory.
Create the Assignments directory in the CST8207-19W directory.
Create the assignment03 directory in the Assignments directory.
Hint: You can create the entire directory tree above using one
single command with one option and one pathname argument, as
you did at the end of Section 4 in Worksheet #02 HTML. System
administrators like to work efficiently – they learn how to do
things quickly.
Check the structure of this directory tree by making your
HOME directory your current directory and using one of these tree
commands below. Try all the command lines below and use the command
that gives the best-looking output on your terminal:
$ tree CST8207-19W
$ tree -A CST8207-19W
$ tree --charset=utf8 CST8207-19W
$ tree --charset=none CST8207-19W
$ tree --charset=latin1 CST8207-19W
$ tree -S CST8207-19W
The correct output will look similar to the ASCII tree diagram below.
The spelling and capitalization must be exactly as shown.
CST8207-19W
`-- Assignments
    `-- assignment03
This assignment03 directory is called the Base Directory for most
pathnames in this assignment. Store your files and answers in this
Base Directory, not in your HOME directory or anywhere else.
Make Base Directory you created above (assignment03) your current
directory for this task.
second-argument.txt
The echo command displays its arguments on your screen, separated
by spaces. It can also put the arguments into a file if you use
output redirection, for example you can give it two arguments:
$ echo hi there
hi there
$ echo hi there >foo                    # redirect the echo output into file foo
$ cat foo                               # display contents of file foo on your screen
hi there
$ ls                                    # list all the files on your screen
foo
$ rm foo                                # delete (remove) the file foo
Looking at the above command line that uses output redirection, type
a new echo command line that uses only the second argument
(not both arguments) from that command line, and redirect the
output (just the second argument from above) into a file named
second-argument.txt. The output file should contain only one word.
Hint: What is the second argument in that command line? Type a
new command line that echos just that one word into the output file.
In the following tasks you will be asked to use echo to echo specific
arguments from previous command lines into output files.
Make the Assignments directory that you created above your
current directory.
Stay in this directory for the rest of this task.
Do not change directories during the rest of this task.
Run the command that shows your current working directory. One line
should display on your screen that looks similar to this:
/home/abcd0001/CST8207-19W/Assignments
cddir.txt
Redo the previous command, and this time redirect the output of the
command into the file cddir.txt in the current directory (just as
you did in Assignment #02).
Hint: Recall that you can redirect into a file any output that
appears on your terminal screen. You did this output redirection
using the date command to create the file date.txt in Assignment #02.
Make sure that the redirection output file that you just created
contains your current working directory before you continue.
Re-read the part at the start of this assignment about drawing file
system diagrams on paper so you know what you are doing. Do it now.
Move (rename) the cddir.txt file from the current directory
(Assignments) down into your Base Directory using the shortest
relative pathname to do the move. (You did work similar to this in
Section 4 of Worksheet #03 HTML.)
Remember the “shortest relative pathname” you just used in the last
command line. You will need to use that pathname later.
Use a command that shows file names to confirm that there are no
files left in the current Assignments directory. (You should
only see the directorybasename of the Base Directory
in the current directory. That is all you should see.)
Remove any names that do not belong.
Use the echo command to display on your terminal screen the
“shortest relative pathname” that you remembered and just used as
the second argument to the previous move command. Echo just this
one pathname onto your screen.
Hint: If you want to be lazy and not re-type the pathname,
you can do this: Use UP-ARROW to recall and then and edit the move
command line you used. Remove the first argument from the command
line, and then replace the move command name by the echo command
name so that only the second pathname echoes to the terminal screen.
Do not include the first pathname.
echorel.txt
Without changing directories, redo the previous echo command, and
this time redirect the output of the command (the relative pathname)
into the file echorel.txt in your Base Directory (not in the
current directory).
Hint: For the redirection output file pathname, you must use
a relative pathname that leads from your current directory
Assignmentsdown into the Base Directory. The relative
pathname will contain one embedded slash separating two
name components. The basename of the relative pathname must be
the destination file name echorel.txt
Use a command to confirm that the Base Directory contains the new
echorel.txt file. The current directory should not contain any files.
From the current Assignments directory, change directories and make
the CST8207-19W directory that you created above your current
directory, using the shortest relative pathname to change from
Assignments to CST8207-19W.
Stay in this directory for the rest of this task.
Do not change directories during the rest of this task.
Remember the “shortest relative pathname” you just used in the last
command line. You will need to use that pathname later.
There should be no files in this CST8207-19W directory. Use a
command to verify that there are no files here. The only name here
should be the directory named Assignments. If there are files
in this CST8207-19W directory, delete the files before continuing.
(Don’t delete the Assignments directory!)
pathrel.txt
Without changing directories, use the echo command with
output redirection to save the “shortest relative pathname” argument
that you remembered and just used, into file pathrel.txt in your
Base Directory (not in the current directory).
Hint: For the redirection output file pathname, you must use
a relative pathname that leads from your current directory
CST8207-19Wdown into the Base Directory. The relative
pathname will contain two embedded slashes separating three
name components. The basename of the relative pathname must be
the destination file name pathrel.txt
Still in the current CST8207-19W directory, use the command from
the worksheet to recursively walk the current directory and print
all the pathnames under the current directory on your screen.
Hint: You used this exact command to print all the pathnames
under the current directory in Section 8 of Worksheet #02 HTML.
F0und.txt
Repeat the same recursive command you just used and redirect the
output of the command into file F0und.txt in your Base Directory
(not in your current directory). Note the strange spelling of the
file name.
Hint: For the redirection output file pathname, you must use
a relative pathname that leads from your current directory
CST8207-19Wdown into the Base Directory, as you did above.
See the previous Hints.
Use a command that shows file names to confirm that the
pathrel.txt and F0und.txt files are located only in the Base
Directory and not in the current directory or anywhere else.
You may find it easier to type pathnames in this task if you make the
Base Directory you created above (assignment03) your current directory
for this section.
The file names in this section have been deliberately chosen to
contain characters that look similar but are not the same.
Pay strict attention to the spelling of the names used.
ca1new,txt
Copy the 1752 cal.txt file you created in Assignment #02 HTML
into the Base Directory using the new name ca1new,txt for the
file. (Note carefully the spelling and punctuation character used in
this new name.)
1ldIr
Create the following directory structure starting in the Base Directory
and record (for study purposes) the series of commands you used
to create it. Spelling and capitalization must be exactly as shown:
Create the 1ldIr directory in the Base Directory.
Pay careful attention to the name; every letter in the name
is a different character.
Under directory 1ldIr create two new directories
named a0oO and bOo0 (four characters each, including one digit).
Under directory a0oO create new directory O0osub (six
characters, including one digit).
Under directory bOo0 create new directory 0Oosub
(six characters, including one digit).
Hint: You can create the entire directory tree above using
one single command with one option and two pathname arguments,
as you did at the end of Section 4 in Worksheet #02 HTML.
System administrators like to work efficiently – they learn how to
do things quickly.
Check the structure of this directory tree using the same command as
you used in the previous section.
The correct directory tree under the Base Directory must
look similar to the ASCII tree diagram below. The spelling and
capitalization of each name must be exactly as shown.
1ldIr
|-- a0oO
|   `-- O0osub
`-- bOo0
    `-- 0Oosub
lId1r
Copy the directory 1ldIr to new directory lId1r using the
correct directory copy option, as you did in Section 3 of Worksheet
#03 HTML. Pay careful attention to the name; every letter in the
new directory name is a different character.
Hint: The new directory lId1r must not exist before you
do this copy! If it already exists, recursively remove it before
you do the copy, or else you will get a spurious incorrect extra
level of directory such as lId1r/1ldIr
Check that the tree structure of lId1r is exactly the same as the
tree structure of the 1ldIr directory from which you copied it.
Use a command to recursively generate a list of all pathnames using
your 1ldIr directory as the starting directory. (You used this
recursive command above, and many times in the Section 8 in
the end of Worksheet #02 HTML. Do not use the tree or ls
commands. Use the 1ldIr directory as your starting directory.)
The recursive output of all pathnames under your 1ldIr directory
will be exactly five lines long and will contain this exact line
in the output somewhere (along with another four lines):
1ldIr/a0oO/O0osub
Make sure the exact line above appears as one of the five lines!
myPaths.txt
When the five lines of recursive output above on your screen looks
correct, redirect the output of the command into the file named
myPaths.txt in the O0osub directory that you created earlier under
the lId1r directory.
Hint: Draw a file system tree diagram so that you know what
relative pathname to use. Don’t try to invent the pathname in
your head! Don’t redirect the output into the current directory!
Hint: For the output redirection file, use a relative path
from your current directory down into the O0osub directory under
lId1r. The relative pathname will contain three embedded
slashes separating four name components. The basename
of the relative pathname is the destination file name myPaths.txt
Make the O0osub directory under lId1r your current directory.
(Make sure you get the right one under lId1r and not
1ldIr! Display your current working directory and make sure.)
Hint: Draw a file system tree diagram so that you know what
relative pathname to use. Don’t try to invent the pathname in
your head!
Use a command to list the files in the current (O0osub) directory
to confirm that the myPaths.txt file is here. Use another command
to display the contents of the myPaths.txt file, and make sure it
contains exactly five lines of pathnames from under the 1ldIr
directory, including the sample line shown earlier.
myPaths.txt.copy
From in the O0osub directory, copy the myPaths.txt file (from the
current directory) into the 0Oosub directory that is also under
the lId1r directory, giving it the new name myPaths.txt.copy as
the destination file name for the copy. Use relative pathnames to
do the copy.
Hint: Draw a file system hierarchy picture to help you derive
the correct relative pathname. For the destination file, use a
relative path from your current directory that goes up the
tree and then down into the bOo0 directory. The relative
pathname will contain four embedded slashes separating five
name components. The basename of the relative pathname should
be the destination file name.
Copycmnd.txt
Save a copy of the command line you just used into a file as follows:
Use the Up-Arrow key to retrieve the copy command you just typed.
Use the Left-Arrow key to move all the way left and then prefix
the copy command line you just typed with the word echo; type
the word echo followed by a space at the start of the command
line, in front of the copy command name.
Push the [Enter] key and confirm that the copy command name and
its two relative pathname arguments echo onto the screen.
Again use the Up-Arrow key to retrieve the echo command you
just typed.
To the right end of the echo command line, add redirection
to redirect the echo output into file Copycmnd.txt
in the Base Directory. No output should appear on screen.
The Copycmnd.txt file should contain on one line: the copy
command name followed by two relative pathname arguments, exactly
as you typed it in the preceding question.
Hints: Because the Copycmnd.txt output file must be located
in the Base Directory, not in the current O0osub directory, you
need to specify a relative redirection output pathname that goes
up several levels to the Base Directory. The relative pathname
will contain three embedded slashes and many parent directories.
The basename of the relative pathname is the destination file name
Copycmnd.txt
You will need to use the echo command to create another file later
in this assignment. Remember how you used it here.
4.9 Working with existing directories and files: MyDirIndex
Execute this exact command line in your account on the CLS:
~idallen/cst8207/19w/assignment03/create_mydir.sh
There is a leading tilde character ~ directly in front of
the account name idallen, indicating to the shell that the
pathname starts with the HOME directory of idallen (seven
letters).
MyDir
The command will create a directory named MyDir in your Base
Directory. The directory will contain some sub-directories and files.
To know what files and directories have been created by the above
command line, use a command that will recursively show all the files
and directories under a starting directory. (You already used this
command, above.) Make sure you use the correct command to recursively
show all the files and directories, not just the first layer.
You can re-execute the above create_mydir.sh command line to start
this task over from scratch, if you make errors in this part of
the assignment, but you will have to rename or remove the existing
MyDir first.
You will be asked to make some changes to this existing set of files and
directories. You must not make any changes other than the changes
asked. If you accidentally create or delete files not required,
you may change the modify time of sub-directories and you will have
to erase the whole directory and start over.
All the following commands in this task section apply to files and
directories under the new MyDir directory. You will have to use
commands to find some of the file names mentioned here; they may be
located under sub-directories; see Finding Files. Some of these tasks
may require more than one command to complete.
Find and read the file named README.txt (located somewhere under
some directory under MyDir). You have to find this file.
Read and then delete the file foo.txt that is in the same
directory as the README.txt file. (Do not delete any other decoy
files named foo.txt that may be in other directories.)
bar.old
Move (rename) the only file named bar to be bar.old
Hints: This is a move, not a copy; it renames the file.
Make sure you rename the file, not any decoy directories with the
same name. You know a command that can find names that are files
(and not directories) by using the -type f expression
from Finding Files along with the -name expression that you
already know from Section 8 in Worksheet #02 HTML.
bar
Directly under the MyDir directory, create a new
empty directory named bar (three letters). (Make sure you create
bar under MyDir, not in your HOME or any other directory.)
Hints: If this command fails with the message File exists,
you need to re-read the Hints on the previous item.
stuff.old
Find the file named stuff (not the directory with the
same name) and move (rename) that stuff file to be named
stuff.old under the new directory bar that you just
created. (This is a move/rename, not a copy.) Make sure you
move the file, not any directory with the same name.
4.10 Working with new directories and files: top1bNNNNNIndex
You may find it easier to type pathnames in this task if you make the
Base Directory your current directory for the next few sections.
When the word count is given for a command, the numbers are the
values you should get if you pipe the command output into the word
count command, e.g. echo hi mom | wc should print 1 2 7
(one line, two words, seven characters (counting the space character
and the invisible newline character at the end of the line).
top1bNNNNN
Create the following directory structure starting in the Base Directory
and record (for study purposes) the series of commands you used
to create it. Spelling and capitalization must be exactly as shown:
Create a directory named top1bNNNNN in your
Base Directory, where NNNNN is replaced by the last five
digits of your nine-digit student number. (If your student
number is 123456789 then your directory name would be
top1b56789.)
Under directory top1bNNNNN create two new directories
named dir1b and dir2b (four letters and one digit each).
Under directory dir1b create new directory dir1b-1 (four
letters, two digits, and one dash).
Under directory dir2b create new directory dir2b-1 (four
letters, two digits, and one dash).
Hint: You can create the entire directory tree above using
one single command with one option and two pathname arguments,
as you did at the end of Section 4 in Worksheet #02 HTML.
System administrators like to work efficiently – they learn how to
do things quickly.
Verify that the directory tree under top1bNNNNN
looks similar to the ASCII tree diagram below. The spelling and
capitalization must be exactly as shown:
top1bNNNNN                    # replace NNNNN with your own number
|-- dir1b
|   `-- dir1b-1
`-- dir2b
    `-- dir2b-1
Make the above directory top1bNNNNN
(in your Base Directory) your current directory.
Use a command to recursively generate a list of all pathnames in the
current directory.
Hints: You used this recursive command many times in Section 8
of Worksheet #02 HTML. Do not use the tree or ls commands.
The recursive output of all pathnames will be exactly five lines
long and will contain this exact line in the output somewhere
(along with another four lines):
./dir2b/dir2b-1
Make sure the exact line above appears as one of the five lines!
The word count of this command output must be: 5 5 50 and if the
count is wrong, re-read all the words in this step.
top1bfind.txt
When the recursive output above on your screen looks correct,
redirect the five lines of output of the command into the file
named top1bfind.txt up in the Base Directory (not in the
current directory). (That file name has one digit in it.) The word
count of this file must also be: 5 5 50.
Hints: If the file has six lines in it, remove the file and
re-read the words “not in the current directory”. You need to use
an output redirection pathname that goes from the current directory
up to the Base Directory. Don’t create the file in the
current directory!
4.11 Working with new directories and files: top2bNNNNNIndex
top2bNNNNN
RTFM in the Manual and find the single-letter option to the copy
program that preserves mode, ownership, and timestamps when you copy.
Make a note of this option in your own course notes; you will use it
often as a system administrator.
Choose the appropriate current directory before you do this task:
Under your Base Directory create another directory
top2bNNNNN that
contains a copy of everything you created under directory
top1bNNNNN, with the timestamps preserved.
The five letters NNNNN must be replaced by the last five
digits of your nine-digit student number.
Hints: The fastest way to do this is with a single recursive
copy command, as you did in Section 3 of Worksheet #03 HTML, but
add the option to preserve timestamps. Do not create the
top2bNNNNN
directory before you copy. The new directory
top2bNNNNN must not
exist before you do this copy! If it already exists, recursively
remove it before you do the copy, or else you will get a spurious
incorrect extra level of directory such as top2bNNNNN/top2bNNNNN
Make sure the time stamps have been preserved in the copy, before you
continue, or else you will have to redo this whole section.
emt
Use a command to create an empty file named emt in each of the five
directories from top2bNNNNN down.
You will create five empty files,
one in each of five directories.
Hints: You can do this with one single command name and five
relative pathnames. If you’re using the cd command to do this,
you’re wasting time.
Make the directory top2bNNNNN
(in your Base Directory) your current directory.
Use a command to recursively generate a list of all pathnames under
your current directory. The recursive output of all pathnames
under your current directory will be exactly ten lines long and
will contain this exact line in the output somewhere (along with
another nine lines):
./dir2b/dir2b-1/emt
Make sure the exact line above appears as one of the ten lines!
The word count of this command output must be: 10 10 120 and if the
count is wrong, re-read all the words in this step.
top2bfind.txt
When the recursive output above on your screen looks correct,
redirect the ten lines of output of the command into the file named
top2bfind.txt in the Base Directory (not in the current directory).
The word count of this file must also be: 10 10 120.
Hints: If the file has 11 lines in it, remove the file and re-read
the previous task’s Hints about “not in the current directory”.
4.12 Working with new directories and files: top3bNNNNNIndex
top3bNNNNN
Under your Base Directory create another directory
top3bNNNNN that contains
a copy of everything that you created under
top2bNNNNN, with timestamps
preserved.
The five letters NNNNN must be replaced by the last five
digits of your nine-digit student number.
Hints: See the previous task Hints!
Make sure the time stamps have been preserved in the copy, before you
continue, or else you will have to redo this whole section.
emt3b, emt2b-1etc.
Under top3bNNNNN rename each of the emt files to have the suffix of the
immediate parent directory that contains it, e.g. rename
top3bNNNNN/emt to be
top3bNNNNN/emt3b and dir2b-1/emt to be dir2b-1/emt2b-1, etc.
You don’t know enough scripting yet to do this with a script; do
each of the five files manually.
Hint: The -type f expression may again be useful here to
generate a recursive list of only file names and not show directory
names; see Finding Files and Section 8 in Worksheet #02 HTML.
Make the directory top3bNNNNN
(in your Base Directory) your current directory.
Use a command to recursively generate a list of all pathnames under
your current directory. The recursive output of all pathnames under
your current directory will be exactly ten lines long and will
contain this exact line in the output somewhere (along with
another nine lines):
./dir2b/dir2b-1/emt2b-1
Make sure the exact line above appears as one of the ten lines!
The word count of this command output must be: 10 10 134 and if the
count is wrong, re-read all the words in this step.
top3bfind.txt
When the recursive output above on your screen looks correct,
redirect the ten lines of output of the command into the file named
top3bfind.txt in the Base Directory (not in the current directory).
The word count of this file must also be: 10 10 134
Hints: If the file has 11 lines in it, remove the file and re-read
the previous task’s Hints about “not in the current directory”.
Create a new directory named mymaze in your Base Directory.
Under the Source Directory there is a directory named maze (four
letters) with many, many sub-directories and sub-sub-directories, etc.
(The maze contains over 16,160 pathnames.)
Somewhere under this large maze directory, find the one file with a
12-character basename that looks similar to abcd0001-txt
but where the eight-character abcd0001 part of the name is
replaced by your own account userid.
Pay careful attention to the exact spelling of the 12-character
basename of the required file.
Write down the absolute path to the maze directory.
You will need to use this pathname as a Starting Directory when
you recursively search for the required file name.
Verify that your pathname is correct by using ls to list
the names in the directory. Over a thousand names should
display. Do not proceed until you get the maze pathname correct!
You must use a single command that recursively finds files by
basename to find your 12-character file name. You have
previously seen the command you will need in the first item
b. of Section 8 of Worksheet #02 HTML.
Recall that you do not have permission to list the names of
all the files in the Source Directory, but you can access the
maze directory there because you know its name.
This maze directory contains many hidden sub-directories; you
need a special option to see hidden files and directories.
Do not try to use cd or ls to find the file in the
maze; the maze is very big. Use the correct command to
recursively search the maze directory for the file name.
Read the file when you find it. The file content will tell you
clearly that you have found the right file. If you see XXX
in the file, it is not the right file.
Mazepath.txt
When the above command has found your personal abcd0001-txt
file in the maze and outputs exactly one line, put the absolute
pathname of your personal file (one line) into a file named
Mazepath.txt in the mymaze directory that you created in step
1 above.
Hint: It must be the absolute pathname. You will have to
draw a file system diagram and figure out what that pathname is; no
command will show it to you. You can test your absolute pathname by
giving it as an argument to a command that reads pathnames, e.g. to
ls, wc, cat, sum, etc. and make sure you get no error message.
Hint: You can use the echo command with output redirection to
put one line of text into any file. (You used the echo comand in a
similar way to create the one-line Copycmnd.txt file, earlier.)
When you know the absolute pathname, give the echo command
one argument that is the absolute pathname of your personal
file in the maze. Make sure the pathname echoes onto your screen.
Then, add output redirection to this echo command so that the
echo output goes into the Mazepath.txt file and not onto your
screen. The Mazepath.txt file should contain one line that is
the absolute pathname of the found file in the maze.
Treasure.txt
Copy only your one personal file from the maze into your mymaze
directory using the new file name Treasure.txt. Read the file to
make sure it’s the right one before and after you copy it into your
own mymaze directory; the file content will tell you clearly that
you have found the right file. If you see XXX in the file, it is
not the right file.
Hint: Be careful not to copy the entire maze directory!
Copy only the contents of one file into mymaze.
Create a directory named assignment02 under Assignments to
store all your Assignment #02 files and move all your Assignment
2 files down into that directory.
Re-run the Assignment 2 checking program to make sure it can find
all your Assignment 2 files in their new location.
Run the Assignment 3 Checking Program to verify your work so far.
Check your work a final time using the Checking Program below and save
the standard output of that program into a file as described below.
Submit that file (and only that one file) to Brightspace following the
directions below.
Your instructor will also mark the Base Directory in your account on
the due date. Leave everything there on the CLS. Do not delete anything.
When you are done, log out of the CLS before you close your laptop
or close the PuTTY window, by using the shell exit command:
$ exit
Nothing seriously bad will happen if you forget to log out, but you may
leave behind an empty, “ghost” login session that may take some days
to time out and disappear. Always exit before you close your laptop,
PuTTY, or Terminal session.
5 Checking, Marking, and Submitting your WorkIndex
Summary: Do some tasks, then run the Checking Program to verify
your work as you go. You can run the Checking Program as often as
you want. When you have the best mark, upload the single file that is
the output of the Checking Program to Brightspace.
Since I also do manual marking of student assignments, your final mark
may not be the same as the mark submitted using the current version of
the Checking Program. I do not guarantee that any version of the
Checking Program will find all the errors in your work. Complete
your assignments according to the specifications, not according to
the incomplete set of the mistakes detected by the Checking Program.
There is a Checking Program named assignment03check in the
Source Directory on the CLS. You can execute this program by
typing its (long) pathname into the shell as a command name:
Note the leading tilde ~ character on the command name. You will
learn of ways to make this long line shorter in future assignments.
When you are done, execute the above Checking Program as a
command line on the CLS. This program will check your work, assign
you a mark, and display the output on your screen.
You may run the Checking Program as many times as you wish,
allowing you to correct mistakes and get the best assignment mark.
Some task sections require you to finish the whole section before
running the Checking Program at the end; you may not always be
able to run the Checking Program successfully after every single
task step.
When you are done with this assignment, and you like the mark
displayed on your screen by the Checking Program, you must
redirect only the standard output of the Checking Program
into the text file assignment03.txt in your Base Directory on the
CLS, like this:
Use standard output redirection with that exactassignment03.txt file name.
Use that exact name. Case (upper/lower case letters) matters.
Be absolutely accurate, as if your marks depended on it.
Do not edit the output file; the format is fixed.
You can view the output file one-page-at-a-time using the less
program (use the space bar to page forward and use the letter q to quit):
$ less assignment03.txt
In less use the space bar to page forward and use the letter q to quit).
Make sure the file actually contains the output of the
Checking Program!
The file should contain, near the bottom, a line starting with:
YOUR MARK for
Really! MAKE SURE THE FILE HAS YOUR MARKS IN IT!
Transfer the above single file assignment03.txt (containing the
output from the Checking Program) from the CLS to your local computer.
Refer to the File Transfer page for how to transfer the file.
Verify that the file still contains all the output from the Checking Program.
Do not edit or open and save this file on your local computer!
Edited or damaged files will not be marked. Submit the file
exactly as given.
The file should contain, near the bottom, a line starting with: YOUR MARK for
Really! MAKE SURE THE FILE YOU UPLOAD HAS YOUR MARKS IN IT!
Upload the single assignment03.txt file from your local computer to the
correct A-03 Assignment #03 area on Brightspace before the due date:
See Assignment #01 for details on how to upload files to Brightspace.
Only upload the one file that is the standard output of the
Checking Program.
Make sure the file has the correct assignment03.txt name.
Make sure you upload it to the right place, not into Assignment 1 or 2!
Your instructor may also mark files in your directory in your
CLS account after the due date. Leave everything there on the CLS.
Do not delete any assignment work from the CLS until after the
term is over!
Notes:
I do not accept any assignment submissions by EMail.
Use only the Brightspace Upload and Submit method.
Use the exact file name given above. Upload only one single file of
output from the Checking Program.
No marks are awarded for submitting under the wrong assignment number
or for using the wrong file name. Use the exact 16-character,
lower-case name given above.
WARNING: Some inattentive students don’t Read All The Words.
Don’t make that mistake! Be exact.
READ ALL THE WORDS. OH PLEASE, PLEASE, PLEASE READ ALL THE WORDS!
Author:
| Ian! D. Allen, BA, MMath - idallen@idallen.ca  -  Ottawa, Ontario, Canada
| Home Page: http://idallen.com/   Contact Improv: http://contactimprov.ca/
| College professor (Free/Libre GNU+Linux) at: http://teaching.idallen.com/
| Defend digital freedom:  http://eff.org/  and have fun:  http://fools.ca/


