On paper, you will miss updates, corrections, and hints added to
the online version.
On paper, you cannot follow any of the hyperlink
URLs that lead you
to hints and course notes relevant to answering a question.
On paper, scrolling text boxes will be cut off and not print properly.
Due Date: 23h59 (11:59pm) Friday March 1, 2019 (end of Week 7)
You have several weeks to do this assignment because you need get
together with friends in a study group and do two worksheets first.
Do the worksheets first and check your answers with your classmates.
Your next assignment will be available in a few days and will
overlap this assignment. Start work on this now! Don’t delay!
Late assignments or wrong file names may not be marked.
Please be accurate and punctual.
An ability to READ ALL THE WORDS to work effectively.
Deliverables
One plain text file uploaded to Brightspace according to the
steps in the Checking Program section below.
Use Remote Login to connect to the Course Linux Server
(CLS) and use commands in The Unix/Linux Shell to
create directory structure and files for marking on the CLS. Do not delete any assignment work from the CLS until after the
term is over!
WARNING: Some inattentive students upload Assignment #05 into the
Assignment #04 upload area. Don’t make that mistake! Be exact.
This assignment is based on your weekly Class Notes and covers these topics:
Select names using GLOB patterns.
Search the course notes for keywords using GLOB patterns.
Copy 100 files based on a complex GLOB pattern.
Identify Unix, Windows, and Macintosh text file types.
Find file names in a directory using a GLOB pattern.
Find basenames recursively in a maze using a GLOB pattern.
Use redirection to append to a file.
Search some system log files and produce summary information
2.1 Prerequisites: Do Worksheet 4 and Worksheet 5Index
You must complete the two Worksheets before attempting this assignment.
The worksheets depend on the Readings in the weekly course notes,
especially Shell GLOB Patterns and Redirection and Pipes.
These worksheets prepare you to do the rest of the tasks listed below.
Failure to complete the worksheets will make the rest of this assignment
very difficult. Do the worksheets first! Record and save all your
worksheet answers for study and quizzes!
You must download Libre Office (or Open Office) for Windows to edit the
Worksheet *.odt files and save your answers. (Or you can print the
PDF and write your answers on paper.) Do not use Microsoft Word;
it will mangle the numbering and format of the worksheet.
Do the tasks in order, from top to bottom.
Do not skip steps. Most tasks are independent, but some depend
on successful completion of a previous task.
READ ALL THE WORDS in each task before you begin the
task, especially all the Hints and links.
Verify your own work before running the Checking Program.
You won’t have a checking program at your job interview and
the Checking Program is not guaranteed to check everything.
Run the Checking Program at the end of the task to grade your
work and help you find some of your errors. A perfect mark from
the Checking Program does not mean your answers are correct.
When you are done with this Assignment, submit the output of the
Checking Program to Brightspace before the due date, following
the directions given at the end of this Assignment.
You can use the Checking Program to check your work after you
have completed each task.
Most task sections below require you to finish the whole task section
before running the Checking Program. You may not always be able
to run the Checking Program successfully in the middle of a task
or after every single task sub-step. The assignment tells you where
you can safely check your work.
You will create file system structure in your CLS home directory
containing various directories and files.
When you are finished the tasks, leave the files and directories in
place on the CLS as part of your deliverables for your instructor
to verify.
Assignments may be re-marked at any time on the CLS; you must have
your term work available on the CLS right until term end. Do not
delete any assignment work until after the term is over!
You can modify your work and check it with the Checking Program
as often as you like before you submit your final mark to Brightspace.
You can upload your marks to Brightspace as many times as you like
before the due date. Partial marks are accepted.
Your instructor will also mark on the due date the work you do in your
account on the CLS. Leave all your work on the CLS and do not modify
it after you have submitted your final mark to Brightspace.
You must keep a list of command names used each week and write down
what each command does, as described in the List of Commands You
Should Know. Without that list to remind you what command names to
use, you will find future assignments very difficult.
All course notes are available on the Internet and also on the CLS. You
can learn about how to read and search these CLS files using the command
line on the CLS under the heading Copies of the CST8207 course notes
near the bottom of the page Course Linux Server. You also learn
how to search the notes in Assignment #05 HTML.
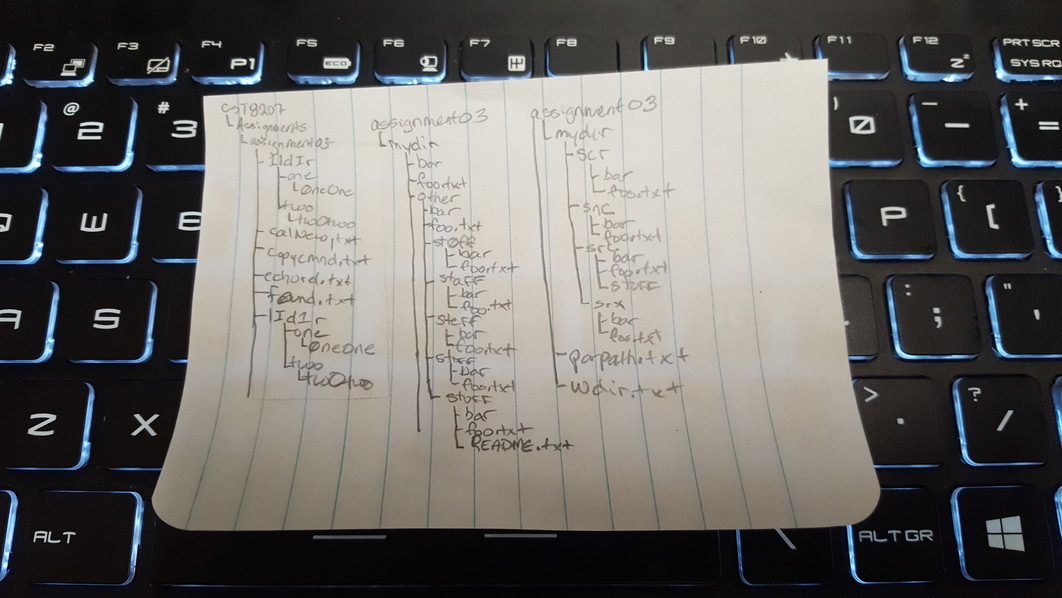
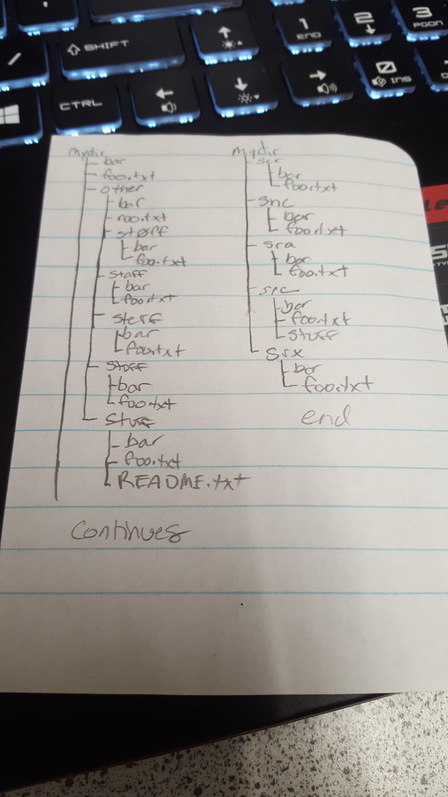
Many students find it extremely helpful to draw a quick graph/picture
of their file system directory structure on paper before attempting to
answer questions about relative pathnames.
You need to be able to visualize the relative locations of names in
the file system tree to answer these questions. Draw the trees on
paper!
All references to the Source Directory below are to the CLS directory
~idallen/cst8207/19w/assignment05/ and that name starts with a
tilde character ~ followed by a user name with no intervening slash.
The leading tilde indicates to the shell that the pathname starts with
the HOME directory of the account idallen (seven letters).
You do not have permission to list the names of all the files in the
Source Directory, but you can access any files whose names you already know.
Do a Remote Login to the Course Linux Server (CLS) from any
existing computer, using the host name appropriate for whether you
are on-campus or off-campus.
All work in this assignment must be done on the CLS.
Create the assignment05 directory in your usual Assignments directory.
Hints: See your previous assignment for hints on doing the above.
This assignment05 directory is called the Base Directory for most
pathnames in this assignment. Store your files and answers in this
Base Directory, not in your HOME directory or anywhere else.
In your HOME directory, create two symbolic links to the old and new
course notes for CST8207 using the ln -s command and
option and the method described in Copies of the CST8207 Course
Notes.
(The old notes must be term 18f and the new notes must be term
19w in the pathnames you use.)
Do a long listing of the new oldnotes symlink (with no trailing
slash) and verify that it looks similar to this (but the userid and
time will differ):
You should be able to do ls oldnotes | less and see all the
course notes file names from last term (18f). If not, remove and
redo the symlink.
In your HOME directory, use the ls command with no options and a
single shell GLOB pattern to match all pathnames under the symbolic
link oldnotes/ that end in .txt and display all the names on your
screen. The shell will find 93 pathnames ending in .txt, and the
ls command will display those 93 names on your screen.
One of the last names on your screen should look exactly like this:
oldnotes/worksheet08.txt
Make sure you see 93 pathnames. (You can use a command pipeline to
count the lines and words to be sure you have 93.)
Hints: No pipeline or find commmand is required to
generate the 93 pathnames, just use the ls command with
no options and one single GLOB pattern argument (no spaces) starting
with the symlink oldnotes/. This use of a GLOB pattern on
a command line is illustrated in Copies of the CST8207 Course
Notes.
The example in the notes uses the given GLOB pattern to generate
pathnames to the ls command and count them. Follow the example
and display the 93 pathnames on your screen instead of counting them.
(Don’t use any redirection yet.)
Review your work in section lab4.2 of Worksheet #04 HTML.
OldFound.txt
When the ls output on your screen is correct (93 names), redirect
the output 93 names into file OldFound.txt under your Base
Directory (not under your current HOME directory). The file must
contain 93 names, one per line.
Note: The ls command will put each name on a separate line
when output is not being sent to your screen. It is one of the
very few commands whose output format changes when being sent
to a terminal.
Still in your HOME directory, use the echo command with a shell GLOB
pattern to match all pathnames under oldnotes/ that contain the
word termanywhere in the file name and display the names on
your screen. The shell will find two pathnames ending in .pdf,
and the echo command will display those two names on your screen
on one line.
Hints: See the previous Hints. Use only one single GLOB pattern.
Review your work in section lab4.2 of Worksheet #04 HTML.
foundTerm.txt
When the echo output on your screen is correct (two names on one
line), redirect the output into file foundTerm.txt under your Base
Directory (not under your current HOME directory). The file must
contain two names on one line.
Again in your HOME directory, use the echo command with a shell GLOB
pattern to match pathnames under oldnotes/ that contain the letter
f anywhere in the file name and end in the extension .pdf at
the end. The shell will find four pathnames, each ending in .pdf at
the end, and the echo command will display those four names on your
screen on one (long) line.
Hints: See the previous Hints. Use only one single GLOB pattern.
Review your work in section lab4.2 of Worksheet #04 HTML.
When the echo output on your screen is correct (four names on one
long line), change the command name from echo to ls and add
an option to show the full, long information about the pathnames.
You should see four lines on your screen, showing the full file
information for each of the four files. One of the four lines should
look similar to this:
-rw-r--r-- 1 idallen idallen 44228 Oct 16 04:49 oldnotes/midterm1_18f.pdf
foundPdf.txt
Now redirect the four lines of long output on your screen into file
foundPdf.txt under your Base Directory (not under your current
HOME directory). The file must contain four lines and approximately
36 words.
As mentioned in Worksheet #03 HTML, you can choose which text search
command you use depending on whether special characters are being
used in the search string. You should always use the fixed-string
fgrep command to begin with in this introductory course. You will
learn regular expressions and the grep command next term in Linux II.
Use fgrep for this assignment.
Make your Base Directory your current directory for this section.
MyPasswd.txt
Search in the system password file for lines containing your login userid.
You should find exactly one line. (For an explanation of what the
seven fields are in this line, see man 5 passwd.)
When the output is correct (one line) then redirect the output into
file MyPasswd.txt in your Base Directory. The file should
contain one line.
Search for lines containing a period (dot) character
(.) in the file tobacco.txt in the Source Directory.
Hint: A period can be a special character. Choose the right
text searching command, as described at the start of this section.
The word count of the 39 lines of correct output should be: 39 308 2162
DotLines.txt
When you have the correct 39 lines of output on your screen,
redirect that 39 lines of output (not the word count) into file
DotLines.txt under your Base Directory. The word count of the
file should be the same as above (39 lines).
Search for lines containing two adjacent asterisk characters
(**) in the file tobacco.txt in the Source Directory.
Hint: An asterisk is a special character to the shell. Hide the
asterisks so that the shell does not GLOB expand them. Also choose
the right text searching command, as described at the start of
this section. The word count of the seven lines of correct output
should be: 7 72 487
StarLines.txt
When you have the correct seven lines of output on your screen,
redirect that seven lines of output (not the word count) into file
StarLines.txt under your Base Directory. The word count of the
file should be the same as above (seven lines).
4.5.1 Searching for keywords in the course notes
If you can’t remember which web pages discuss a topic, you can search
using the command line for keywords in all the course web pages.
(This gives much more accurate results than using Google!)
In your Base Directory, create two more symbolic links to the old
and new course notes for CST8207, as you did inside your HOME
directory earlier in this assignment.
In Copies of the CST8207 Course Notes,
see the example use of fgrep with shell GLOB patterns to match *.txt
files in these oldnotes and newnotes directories. The shell GLOB
pattern easily generates a huge list of file names for fgrep to
search inside. In this assignment, do not use any options to fgrep
unless you know what they do.
In the old course notes from last year, use one command to search
inside all the .txt files for lines containing the phrase
other-writable (spelled exactly as shown, case-sensitive).
Three lines should appear, from two files. (The names of the
two files will precede each line of output.)
Hint: You will need to use the same GLOB pattern you used
earlier in this assginment to match all the .txt files under the
oldnotes symlink. This time, use the GLOB pattern to make the
shell give all the file names to the command that searches for text
inside all those files. No pipes are needed to find these lines;
use just one command with no options and a single GLOB pattern.
Looking at the first line of the three lines that print, repeat the
search command but change the search phrase from
other-writable to be
wxxxd-writable, where the word wxxxd is replaced
by the five-letter word starting with w that you see in the first line.
With the new search command, 12 lines should appear, from six files.
Each line of text found will be preceded by the file name in which it
was found. The first line from the previous step will be one of the 12
lines. The word count of the output must be 12 117 1101.
Hint: If you see more than 12 lines of output, you are likely
using options that make the search case-insensitive. If your word
count is wrong because the file names are missing, you are likely
using unnecessary pipes. No pipes are needed to find the 12 lines.
Repeat the above search in all the *.txt files, but add the searching
option that ignores case distinctions when matching lines in the
files (RTFM). Now, 13 lines are found in six different files and
the word count of the output should be 13 124 1185.
Hint: These text-searching commands are case-sensitive by
default – searching inside files for lines containing abc won’t
find any lines containing ABC unless you use an option to ignore
case distinctions during the search. (What option? RTFM)
WorldLines.txt
Redirect the above 13 lines of output (not the word count) into a
file named WorldLines.txt under your Base Directory. The word
count of this file should match the one above.
Directly under the Source Directory there is a name maze (four
letters). What is the absolute path of this maze under that
directory? Put the absolute pathname of this maze in that
directory into a file in your Base Directory with
a basename similar to abcd0001.txt, but use the basename
that starts with your own Brightspace userid, not the fake userid
abcd0001. Use your own userid in the file name.
Save the actual absolute pathname, not a shell tilde short-cut
for an absolute pathname. (Do not start the name with a tilde.)
The file basename must be exactly 12 characters long. The absolute
pathname of the maze itself is over 40 characters long.
You will need this maze absolute pathname in several places, below.
Hints: You will have to draw a file system diagram and figure out
what the absolute pathname is in the Source Directory; no command
will show it to you. Review the Hints under “Finding files in a
large maze” from Assignment #03 HTML.
Use the ls command and a single shell GLOB pattern to display on
your screen on separate lines the absolute paths of all names directly
under the above maze directory that begin with your userid.
(Your userid must be at the start of every name shown.)
Hints: Use the ls command (with no options) with a single absolute
path shell GLOB pattern as an argument, in a manner similar to how you
displayed all the tty names in section 4.1 of Worksheet #04 HTML.
Use the actual absolute pathname, not a shell tilde short-cut for
an absolute pathname. Do not start the name with a tilde.
Hints: You should see six absolute pathnames. One of the six
absolute pathnames will end in abcd0001.txt where abcd0001
is your own userid. Each of the six absolute pathnames should
contain seven forward slashes. The word count of the six output
lines should be 6 6 349. Do not use any options to ls.
FirstMaze.txt
When you have the correct ls command that generates six lines of
absolute pathname output, redirect and save the six lines into file
FirstMaze.txt in your Base Directory.
Hints: The word count of the file should also be 6 6 349.
FirstMaze.sh
Save the exact ls command line with GLOB pattern that you used in
item 2 above into file FirstMaze.sh in your Base Directory.
Pay attention to the file name extension in this file name.
Hints: The file should contain only two blank-separated words: the
command name and a single GLOB pattern. Do not save the redirection
that you added in item 3 above. The word count of the file should
show 1 2 57.
Hints: Make sure that the content of the file is exactly the same
as the ls command you typed in item 2, with no special characters
expanded. The number of blank-separated words in the file should be
exactly two: the command name and a single GLOB pattern argument.
Running the command by typing sh -u FirstMaze.sh should
print the six pathnames on your screen.
Hints: The best way to put this command line in the file is to use
a Linux text editor, or you can use the cat keyboard and EOF method
from section 5.5a in Worksheet #05 HTML. Read this Warning:
Warning: It is tricky to use echo with redirection to put
this command line into the file because the line contains shell
metacharacters. You can’t just stick echo on the front of a
command line that contains shell metacharacters such as quotes
or GLOB patterns; the shell will remove the quotes and expand
the GLOB patterns before the echo command runs. You will need
special Quoting to make it work. You will need to hide all the
shell metacharacters in the command line from the shell. Make sure
the command line echoes correctly to the screen before you try to
redirect it into the file. You can only redirect what you can see!
Use a text editor instead!
These six pathnames are only six of the many file names in the maze
that start with your userid. We need to find them all, in all the
sub-directories, too.
4.7 Finding files recursively in a directory using a find GLOB patternIndex
Standard GLOB patterns when expanded by your shell can only match names
in one directory; they don’t recursively search all the directories in
the entire maze. To find all the names in the maze that start with
your userid, in all directories, we can’t use the shell to expand the
GLOB pattern. We need to hide the GLOB pattern from the shell and pass
the GLOB pattern to a command that recursively searches a directory.
(You have used this command many times already.)
4.7.1 Quoting the GLOB Pattern
You must hide the GLOB pattern from the shell and pass it unchanged
to the command that recursively searches directories. GLOB pattern
metacharacters work the same way to match basenames, as shown in
the examples in Finding Files. Do not let the shell expand the GLOB
pattern!
We need to hide the GLOB patterns from the shell, since we want to pass
the GLOB patterns unchanged to the command we use. Here’s how:
Using the search tools in your web browser (not on the CLS), look for
the string quote in this course notes web page on Searching
for and finding files by name, size, use, modify time,
etc. Read all the paragraphs containing
this quote word (search multiple times) and remember the importance
of quoting. You will need to know how to do this quoting when you
start the finding and searching work for this task on the CLS, below.
HowQuote.txt
From the end of the first paragraph you found, above (Under the
heading Five common ways), put the e.g. example command line
(showing the use of quotes around the *.txt argument that contains
a GLOB character) into file HowQuote.txt in your Base Directory.
The file must contain just the example command line text after the
e.g. and it will be one line, three words, 19 characters.
If the count is wrong, look in the file to see what is wrong with
the text. Does the file contain exactly the same text as the
course notes? If not, edit the file and fix it.
Hints: The best way to put this example line in the file is to
use a Linux text editor, or you can use the cat keyboard and EOF
method from section 5.5a in Worksheet #05 HTML. Read this Warning:
Warning: It is tricky to use echo with redirection to put
this command line into the file because the line contains shell
metacharacters. You can’t just stick echo on the front of a
command line that contains shell metacharacters such as quotes
or GLOB patterns; the shell will remove the quotes and expand
the GLOB patterns before the echo command runs. You will need
special Quoting to make it work. You will need to hide all the
shell metacharacters in the command line from the shell. Make sure
the command line echoes correctly to the screen before you try to
redirect it into the file. You can only redirect what you can see!
Use a text editor instead!
Use the absolute pathname of the maze name in the Source Directory
as an argument to ls along with an option that shows the long
information about the pathname. (You already saved this maze
pathname in a file, above.)
Use the actual absolute pathname that you saved, not a shell tilde
short-cut for an absolute pathname. (Do not start the name with
a tilde.) Do not put a trailing slash on the pathname.
Hints: You should see exactly one line of output. You have the
right option to ls if the first word of the output is lrwxrwxrwx,
indicating that maze name is a symbolic link, not a directory.
If the ls long listing gives you a directory listing full of files
instead of one line starting with lrwxrwxrwx, make sure you are
using the right option to ls and the correct Source Directory
path from this assignment and not any previous assignment.
The command you use should use one option and one absolute pathname
(with no trailing slash). It will produce exactly one line of output.
We will learn more about symbolic links in a future assignment.
For now, note that the maze symbolic link has an arrow
that leads to the same directory maze used in Assignment #03
HTML. (See that assignment
for details on the size of this maze.)
LsCmd.sh
Save the full and exact ls command line you just used into file
LsCmd.sh in your Base Directory. Pay attention to the file
name extension in this file.
Running the command by typing sh -u LsCmd.sh should
print the long information about the maze symlink.
InfoMaze.txt
When you have the correct ls command line that generates one
long line of output, redirect and save the output (one line) into file
InfoMaze.txt under your Base Directory.
Again, in a manner similar to your previous assignments, you must
find files in this maze, using the maze as the starting directory.
The symbolic link requires some special handling, because the command
that recursively finds files does not follow symbolic link arguments
on the command line without using an option. You must choose one of
these methods to search this symbolic link to the maze (choose one):
Method 1: Use an option to the finding command that makes it
follow symbolic links only while processing the command line
arguments.
Hint: RTFM, search for while processing, and do not use the
-L option, OR
Method 2: Make the maze your current directory and then recursively
search the current directory. (A current directory can never be a
symbolic link – it must be a real directory.)
You will choose one of the previous two starting directory methods
to reach the maze when you start searching, below.
As you know from a previous assignment, this maze contains many
hidden sub-directories. With this maze as a starting directory
using one of the two above methods, use a single command (no pipes
needed) to recursively find all pathnames with a basename that
begins with your eight-character userid at the start of the name.
For example, if your userid were abcd0001 then you might
match and output pathnames containing basenames such as abcd0001
and abcd0001YYY but notXXXabcd0001 or XXXabcd0001YYY or
abcdYYYY where XXX and YYY can be any non-empty strings
of characters. Your own userid must start every basename.
Your single recursive command should find exactly 23 pathnames.
Hint: You must use a single command (not a pipeline) that is
good at Finding Files by a basename pattern to do this. Do not
try to use cd and ls to find all the files; the maze is really,
really big.
Hint: You have previously used this recursive command many times
without a pattern for the basename. This task requires you to
pass to the command a GLOB pattern that matches your userid followed
by zero or more characters. You must hide the GLOB pattern from
expansion by the shell, so that the shell passes the pattern to
the command.
Hint: If you don’t find any pathnames, re-read the section on
the two Methods for the starting directory, above.
Hint: If you only find a few pathnames, or you get an error
message from find such as find: paths must precede expression,
re-read the section on Quoting the GLOB Pattern, above.
When you see all 23 pathnames on your screen, take the same single
command you used to recursively find the names above and modify it
to use the expression that makes the command show the full detailed
attribute information about the names (including permissions, owner,
size, date, etc.) instead of just the pathname. Use the same command;
just remove -print (the default) and add the right expression.
You will know you have the right expression if the output of the
command is 23 lines and approximately 256 words (instead of 23 words).
Hint: You know which expression to use from your answers in
Worksheet #02 HTML and Worksheet #03 HTML and from reading the
detailed attribute information paragraph at the end of Section
2 of the Finding Files notes.
Pipe the 23 lines of pathname output of the above command into a
sorting program and put the sorted output into file FoundMaze1.txt
under your Base Directory. The sorted file will still contain
exactly the same number of lines and words as you counted, above.
findCmd1.sh
Put the entire above two-command pipeline with redirection that you just
used, into file findCmd1.sh in your Base Directory. Pay attention
to the file name extension of this file name.
Hint: Make sure the command you save in the file includes both
the pipeline and the output redirection. If you run the command file
using sh -u findCmd1.sh you should see no errors and no output
on your screen. (All the output should go into the FoundMaze1.txt
output redirection file.)
Hint: The best way to put this command line in the file is to
use a Linux text editor, or you can use the cat keyboard and EOF
method from section 5.5a in Worksheet #05 HTML. Read this Warning:
Warning: It is tricky to use echo with redirection to put
this command line into the file because the line contains shell
metacharacters. You can’t just stick echo on the front of a command
line that contains shell metacharacters such as pipes or quotes; the
shell will execute the pipes and remove the quotes before the echo
command runs. You will need special Quoting to make it work. You
will need to hide all the shell metacharacters in the command line
from the shell. Make sure the command line echoes correctly to the
screen before you try to redirect it into the file. You can only
redirect what you can see! Use a text editor instead!
Searching this same maze, use a single command (not a pipeline) to
recursively find all pathnames with a basename that contains
your eight-character userid anywhere in the name.
For example, if your userid were abcd0001 then you might output
pathnames containing basenames such as abcd0001, abcd0001YYY,
XXXabcd0001, and XXXabcd0001YYY where XXX and YYY
can be anything (zero or more characters). Your own userid will
be somewhere in every basename.
Your single recursive command should find exactly 48 pathnames.
Hint: See the hints for the previous section.
This command line is a simple modification of the previous one.
When you see all 48 pathnames on your screen, take the same single
command you used to find the names above modify it to use again the
expression that makes the command show the detailed attribute
information about the names, as you did above.
You will know you have the right expression if the output of
the command is 48 lines and approximately 547 words (instead of
48 lines and approximately 64 words).
FoundMaze2.txt
Pipe the 48 lines of pathname output of the above command into a
sorting program and put the reverse-sorted output into file
FoundMaze2.txt under your Base Directory. The reverse-sorted
file will still contain exactly the same number of lines and words
as you counted, above.
Note: Do not use a numeric sort.
findCmd2.sh
Put the entire above two-command pipeline with redirection that you just
used, into file findCmd2.sh in your Base Directory.
Hint: See the hints for the previous section. Make sure the
command you save in the file includes both the pipeline and the output
redirection. Run the file to make sure the saved command works and
that all the output goes into the output file, not on the screen.
Count the lines, words, and characters in the file services
under the /etc directory and put the count in file AppendFile
under your Base Directory. (Use the absolute pathname of the
services file when you count and do not use any pipes.) The file
AppendFile should contain one line containing three numbers and an
absolute pathname at the end (four words, 32 characters). There is
no file extension on this output file; Linux doesn’t care.
Extract just the first line of the same services file and append
this one line to the end of the AppendFile file, so that the file
AppendFile now has two lines in it (the word count line, and now
the first line of services), 9 words, and 67 characters. Do not
use any pipes.
Hint: You know a command that shows any number of lines at the
start of a file. Review your work in Worksheet #05 HTML and the
notes on Redirection and Pipes. Do not use any pipes.
Append the count of the lines, words, and characters in the file
protocols in the /etc directory to the end of file AppendFile,
so that the AppendFile file now has three lines in it, 13 words,
and 97 characters. (Use the absolute pathname of the protocols
file when you count and do not use any pipes.)
Extract just the last line of the same protocols file and append
just this one line to the end of the AppendFile file, so that
the file AppendFile now has four lines in it, 20 words, and 140
characters. Do not use any pipes.
Hint: You know a command that shows any number of lines at the
end of a file. Review your work in Worksheet #05 HTML and the
notes on Redirection and Pipes. Do not use any pipes.
Confirm that the word count of the AppendFile file gives 4 20 140.
If you see the right number of lines but the other values differ, go
back and re-read all the words in the sentences above, especially the
sentences that start with the words “Use the”.
4.9 Searching System Log Files: counting refused IP addressesIndex
The Course Linux Server is on the open Internet and is under constant
attack on its SSH login port. The Denyhosts intrusion protection
system locks out attacking IP addresses so that they are refused when
they try again. Refused addresses are logged in the auth.log file.
IP addresses that are refused by Denyhosts are transferred nightly into an
internal kernel ipset(8) block list (saved in /etc/hosts.evil.ipset),
so that they are locked out by the kernel and won’t appear in further
log messages.
We will find the most common refused IP addresses in the log file.
If necessary, change the month in the example from Jan to be
the first month of the current academic term. The quoted
string must be three letters, one upper-case, with a space following.
Fix the pathname used by fgrep to be an absolute pathname that
reads the real system auth.log file under the /var/log directory.
Add on the end of the pipeline, after the second sort command,
a seventh filter command that limits the output on the screen
to the first five (5) lines. Only five lines should display on
your screen when you run the pipeline, sorted in descending
order of number of attacks.
Hints: Do not change any other parts of the existing six commands
in the pipeline. You need to change the month (if needed), the pathname,
and add a seventh filter command. For January 2019 the first line
of output will be similar to 64 (180.169.207.206) and the last line (of
five lines) will be similar to 11 (2.238.51.96).
RefusedPipe.sh
When the output is correct, use a text editor to put the new
seven-command pipline you used into the file RefusedPipe.sh
in the Base Directory.
(Put the actual pipeline into the file, not the output.)
You can put the pipeline on separate lines with backslashes at
the end of each line to hide the newlines, as shown in the notes,
or you can remove the backslashes and put all seven commands of the
pipeline on one long line. If you keep the backslashes, make sure
that they are at the end of the line with no spaces following.
Typing sh -u RefusedPipe.sh should print the five most active
attack IP addresses for the one month on your screen. If it doesn’t
do this, you haven’t copied the command line correctly. Check it!
You can debug your script file by running it like this:
bash -ux RefusedPipe.sh and making sure you see seven
commands execute before the five lines of output appears.
Edit the RefusedPipe.sh file and add to the end of the file, underneath
your seven-command pipeline, exactly seven numbered shell comments
that explain briefly and in your own words the meaning of each
of the seven commands used in the pipeline, using the exact comment
format described below. Use your own words, not mine or anyone else’s.
Shell script comments start with the number-sign (or hash-tag)
character # and extend to the end of the line. The seven numbered
comment lines must have a syntax similar to this (though this is
the wrong pipeline and wrong comments to use for this task):
last idallen | awk '{ print $2 }' | grep '^pts' | sort -t/ -k2 | uniq | wc -l
# THIS IS AN EXAMPLE OF THE FILE FORMAT; DO NOT USE THESE WORDS OR COMMENTS
# 1. last idallen: show last login lines only for user idallen
# 2. awk '{ print $2 }': display only the second field (terminal name/number) on each line
# 3. grep '^pts': select only terminal lines starting with the letters 'pts'
# 4. sort -t/ -k2: arrange all the terminal lines into ASCII ascending sorted order by terminal number (second field)
# 5. uniq: throw away duplicate adjacent pts terminals, leaving only unique terminals
# 6. wc -l: count the number of unique terminals (the number of lines)
Comment Format: Since there are seven commands in your script
pipeline, you will need to write exactly seven numbered comment
lines to explain them. As you see in the above example, each of the
seven comment lines starts at the left margin with the # comment
character (no spaces in front), followed by a space, number, a period,
space, the pipeline command name and options to which the comment
refers, and then your own comment text written in your own words.
Each comment text is written in your own words to explain what
the command does in the pipeline. Do not copy words; write your own.
Follow the syntax shown in the above example, and use your own
words (don’t copy mine). Including the seven comment lines, your
RefusedPipe.sh file will be at least eight (or more) lines long.
4.10 Searching System Log Files: counting attacksIndex
The Course Linux Server is on the open Internet and is under constant
attack on its SSH login port. The Denyhosts intrusion protection
system locks out attacking IP addresses and logs the event. We will
find the month in 2018 with the most locked out IP addresses.
Write a command to count the number of lines containing the string
new denied hosts: in the denyhosts-2018 log file on the CLS.
(Note the punctuation character at the end of that string!)
This log file is in the same directory as the auth.log
file used in the previous item and in most of the Weekly Class
Notes. Use the absolute pathname
of the log file in your command line; do not change directories.
Hints:
You should find 6319 matching lines in the log file; the output
on your screen should be that one number and nothing else.
My solution used only one command name with no pipes needed.
I used an option to the text searching command that made it count
the number of matching lines, as shown in the weekly course notes.
Short solutions (no pipes) are better than long solutions.
DenyCom1.sh
When the output is correct (one single number), put the command line
you used to generate the single number into file DenyCom1.sh in the
Base Directory.
Typing sh -u DenyCom1.sh should print the single number on
your screen. If it doesn’t do this, you haven’t copied the command
line correctly. Check it!
You can debug your script file by running it like this:
bash -ux DenyCom1.sh and making sure you see the
correct command execute before the output appears.
Write a command pipeline (using pipes) to count the number of lines
containing the same string new denied hosts: in only January 2018
in the denyhosts-2018 log file on the CLS. You should find 528
matching lines to count and the output should be the number 528.
Hints: The sub-section
Example 1: Count ssh break-in attempts in January
given in
Using successive filters in pipes
explains how you might find some lines in the auth.log file
that were created in January. Apply what you learn there to solve
this problem. Before you try, look at the denyhosts-2018 file and
find out what format it uses to represent the date “January 2018”.
(Don’t omit the year!) You can’t just look for the text “January
2018” in the file; it’s not there. Look into the file to see the
actual date format and create a filter command to search for that
date format and count the lines. (Remember to include the year!)
My solution used two command names with one pipe between. The second
command used an option that counted the number of matching lines,
as shown in the weekly course notes.
DenyCom2.sh
When the command pipeline is correct, put the command pipeline you
used to generate the number 528 into file DenyCom2.sh in the
Base Directory.
Typing sh -u DenyCom2.sh should print the number 528 on
your screen. If it doesn’t do this, you haven’t copied the command
line correctly. Check it!
You can debug your script file by running it like this:
bash -ux DenyCom2.sh and making sure you see the
correct commands in the pipeline execute before the output appears.
Using your shell history and the command you used in the previous
item, modify and redo the command a few times to manually find the
number of denied hosts in each month in 2018. Use this to determine
the month with the largest number of denied hosts (1859).
Hint: It’s one of the months after July.
DenyHosts.txt
When you find the month with the largest number of denied hosts, Put
the first five lines and the last five lines of log entries for this
month into file DenyHosts.txt in the Base Directory.
Hint: Use a command pipeline to generate the first five lines
of log output for this month and save them, then modify the command
pipeline slightly to generate the last five lines of log output for
this month and append them to the file containing the first five
lines. That is your answer. The first five lines should be from
the start of the month and the last five lines should be from the
end of the month. The word count of this ten-line file should be:
10 100 849 and the sum should be 47212.
Run the Assignment 5 Checking Program to verify your work so far.
Read All The Words in this section before you start working.
Especially, read all the Hints before you begin!
The “story” here is that a malicious cracker has dumped a bunch of
WAREZ files in a directory on the server and has hidden them among
thousands of other files. (See https://en.wikipedia.org/wiki/Warez.)
Your job is to take a copy of the WAREZ files, and only the WAREZ files,
for use in a court case. You must not touch or copy any other files,
only the WAREZ files.
There is a directory named warez under the Source Directory.
Hidden (really hidden) deeper under this directory is one single
hidden directory containing approximately 111,000 names.
Make this directory your current directory.
Hints: Use cd and the other hints below carefully to find this
huge hidden directory and make this huge directory your current
directory, so that you can experiment with the GLOB pattern you
will need in the following questions.
Hints: Be careful about typing ls in this huge directory without
using any output pagination pipe – the amount of output may flood
your terminal window for some time and even a ^C interrupt may take
a minute or two to interrupt the command! One way to avoid flooding
your screen is by using ls | wc to count how many pathnames
would be output on your screen before you do just ls. Be careful!
Hints: This isn’t a maze. There is only one path down to the
huge hidden directory inside the warez directory, though the way
is hidden. Remember not to type ls in this large directory,
when you find it, because the output is very large!
Do not continue until you have found the directory containing the huge
number of files. Make this huge directory your current directory.
Exactly 100 files in this huge directory (your current directory)
have names that contain your userid (which must be matched lower-case)
followed somewhere later by the text string warez, where warez
is case-insensitive and may appear in any combination of upper-
and lower-case letters, e.g. warez,Warez,wArez,waREz, etc.
Any amount of text may appear before your userid, between your userid
and the warez, and after the warez.
Some sample file names for userid abcd0001 might look like these
(note that the mixed-case warez word must always follow
(appear to the right of) the userid in all the required file names):
Many of the file names are over 100 characters long.
Warez
From in the huge directory, use one single copy command and a single
shell GLOB pattern (no pipes) to copy all 100 (exactly 100) of
these cracker files (and no others) into a new directory named
Warez that you must first create in your own Base Directory.
Make sure you preserve the modify times of the copied files, as you
did in a previous lab. (In this simulation, all the files are empty.)
Hints: Before you try to copy any files, use echo with the GLOB
pattern into word count to verify your GLOB patterns before using
them.
The echo with GLOB pattern should produce exactly 100 pathnames.
The shell must correctly expand the GLOB pattern argument to echo
before you try to use the same GLOB pattern in a copy command.
Once you can echo the 100 pathnames correctly, use exactly the same
GLOB pattern to generate the source pathnames in a copy command.
Do not use a pipe or find or fgrep to select the file names.
Use only the copy command with a GLOB pattern for the source files,
as you did in section 4.1 of Worksheet #04 HTML. The shell can
do all the file name matching using the right GLOB pattern for the
source files.
Do not quote the shell GLOB patten. Quoting hides metacharacters
and turns off shell GLOB patterns. You want the shell to expand
the GLOB pattern for this task! (If you were passing a GLOB pattern
as an expression in a find command, you would quote it so that
the shell didn’t expand it. That is not what you are doing here.)
GlobCopy.sh
Put the copy command line that you used into file GlobCopy.sh in your
Base Directory. Pay attention to the file name extension in this
file name.
Hints: Make sure that the content of the file is exactly the same
as the copy command you typed, with no special characters expanded.
The number of blank-separated words in the file should be about four.
Hints: The best way to put this command line in the file is to
use a Linux text editor, or you can use the cat keyboard and EOF
method from section 5.5a in Worksheet #05 HTML. Read this Warning:
Warning: It is tricky to use echo with redirection to put this
command line into the file because the line contains shell
metacharacters. You can’t just stick echo on the front of a
command line that contains shell metacharacters such as quotes
or GLOB patterns; the shell will expand all those metacharacters
before the echo command runs. You will need special Quoting to
make it work. You will need to hide all the shell metacharacters in
the command line from the shell. Make sure the command line echoes
correctly to the screen before you try to redirect it into the file.
You can only redirect what you can see! Use a text editor instead!
You can check your work by doing a listing of your Warez
directory and counting the number of names that were copied.
All the files should have their original modify dates preserved –
verify this.
Somewhere under the warez directory in the Source Directory you
used earlier for the WAREZ problem are exactly three non-empty files
whose names contain your userid (lower-case) somewhere (anywhere)
in the name. (Most of the other files in the WAREZ directory whose
names contain your userid are empty files.)
Use a command to recursively find and display these three non-empty
(size larger than zero) files with your userid anywhere in the name.
Hints: What command finds files based on expressions that can
include both sizeand a basename that can be a GLOB-style
pattern? You have used this command many times this term. See the
end of Worksheet #02 HTML and the “multiple expressions” example in
Finding Files.
To know that you have the right files, you will find your userid
mentioned inside each file, but because the files are not all
Unix/Linux text files, some of the text content may not display
correctly on your terminal screen. The less command is better than
cat when displaying files containing strange (e.g. unprintable)
characters, but see also the “show-nonprinting” option to cat.
size+0
Put the three pathnames of the non-zero size files into file size+0
in your Base Directory. (That name contains one digit and no
file extension.)
3OSFiles
When you know the three pathnames, manually copy each of these
three files (preserving modify times) to a new directory named 3OSFiles
that you must create in your Base Directory.
Hints: Copy the entire file contents, not just the file names.
Since there are only three file names, you can use your mouse to
copy-and-paste the three long file names you need to copy, once you
know their names. Be careful to use quoting to hide any blanks or
special characters in the names from the shell.
(Optional advanced use: You can also read this optional material on
a better way to use find -exec and xargs.)
UnixWindowsMacintosh
In your 3OSFiles directory, determine which operating system
created each of the three non-empty files.
Rename the Unix/Linux file to be Unix, the Windows file to be
Windows and the Macintosh file to be Macintosh.
Hints: In Assignment #02 HTML you used a command that can
determine file type to identify the text inside a date.txt
file. You will also find this command listed under Week 02
in the List of Commands in your
notebook. Use this command and the notes on Text File Line End
Differences to
identify the special line endings of the Windows and Macintosh files.
Read your CLS Linux EMail and remove any messages that may be waiting.
See EMail on the CLS for help.
Check your work a final time using the Checking Program below and save
the standard output of that program into a file as described below.
Submit that file (and only that one file) to Brightspace following the
directions below.
Your instructor will also mark the Base Directory in your account on
the due date. Leave everything there on the CLS. Do not delete anything.
When you are done, log out of the CLS before you close your laptop
or close the PuTTY window, by using the shell exit command:
$ exit
Nothing seriously bad will happen if you forget to log out, but you may
leave behind an empty, “ghost” login session that may take some days
to time out and disappear. Always exit before you close your laptop,
PuTTY, or Terminal session.
5 Checking, Marking, and Submitting your WorkIndex
Summary: Do some tasks, then run the Checking Program to verify
your work as you go. You can run the Checking Program as often as
you want. When you have the best mark, upload the single file that is
the output of the Checking Program to Brightspace.
Since I also do manual marking of student assignments, your final mark
may not be the same as the mark submitted using the current version of
the Checking Program. I do not guarantee that any version of the
Checking Program will find all the errors in your work. Complete
your assignments according to the specifications, not according to
the incomplete set of the mistakes detected by the Checking Program.
There is a Checking Program named assignment05check in the
Source Directory on the CLS. You can execute this program by
typing its (long) pathname into the shell as a command name:
Note the leading tilde ~ character on the command name. You will
learn of ways to make this long line shorter in future assignments.
When you are done, execute the above Checking Program as a
command line on the CLS. This program will check your work, assign
you a mark, and display the output on your screen.
You may run the Checking Program as many times as you wish,
allowing you to correct mistakes and get the best assignment mark.
Some task sections require you to finish the whole section before
running the Checking Program at the end; you may not always be
able to run the Checking Program successfully after every single
task step.
When you are done with this assignment, and you like the mark
displayed on your screen by the Checking Program, you must
redirect only the standard output of the Checking Program
into the text file assignment05.txt in your Base Directory on the
CLS, like this:
Use standard output redirection with that exactassignment05.txt file name.
Use that exact name. Case (upper/lower case letters) matters.
Be absolutely accurate, as if your marks depended on it.
Do not edit the output file; the format is fixed.
You can view the output file one-page-at-a-time using the less
program (use the space bar to page forward and use the letter q to quit):
$ less assignment05.txt
In less use the space bar to page forward and use the letter q to quit).
Make sure the file actually contains the output of the
Checking Program!
The file should contain, near the bottom, a line starting with:
YOUR MARK for
Really! MAKE SURE THE FILE HAS YOUR MARKS IN IT!
Transfer the above single file assignment05.txt (containing the
output from the Checking Program) from the CLS to your local computer.
Refer to the File Transfer page for how to transfer the file.
Verify that the file still contains all the output from the Checking Program.
Do not edit or open and save this file on your local computer!
Edited or damaged files will not be marked. Submit the file
exactly as given.
The file should contain, near the bottom, a line starting with: YOUR MARK for
Really! MAKE SURE THE FILE YOU UPLOAD HAS YOUR MARKS IN IT!
Upload the single assignment05.txt file from your local computer to the
correct A-05 Assignment #05 area on Brightspace before the due date:
See Assignment #01 for details on how to upload files to Brightspace.
Only upload the one file that is the standard output of the
Checking Program.
Make sure the file has the correct assignment05.txt name.
Do not use any of the names from Assignment 1.
Make sure you upload it to the right place, not into Assignment 2 or 3!
Your instructor may also mark files in your directory in your
CLS account after the due date. Leave everything there on the CLS.
Do not delete any assignment work from the CLS until after the
term is over!
Notes:
I do not accept any assignment submissions by EMail.
Use only the Brightspace Upload and Submit method.
Use the exact file name given above. Upload only one single file of
output from the Checking Program.
No marks are awarded for submitting under the wrong assignment number
or for using the wrong file name. Use the exact 16-character,
lower-case name given above.
WARNING: Some inattentive students don’t Read All The Words.
Don’t make that mistake! Be exact.
READ ALL THE WORDS. OH PLEASE, PLEASE, PLEASE READ ALL THE WORDS!
Author:
| Ian! D. Allen, BA, MMath - idallen@idallen.ca  -  Ottawa, Ontario, Canada
| Home Page: http://idallen.com/   Contact Improv: http://contactimprov.ca/
| College professor (Free/Libre GNU+Linux) at: http://teaching.idallen.com/
| Defend digital freedom:  http://eff.org/  and have fun:  http://fools.ca/


