Updated: 2015-03-26 12:16 EDT

1 Overview for VirtualBox InstallationIndexup to index

This document was originally written by CST student Joshua Caseley.

This document outlines how to install CentOS into the free VirtualBox virtualization software.

Students should normally be installing CentOS into VMware using the CentOS Install and Configure document.

This VirtualBox document is only for students who are having problems using VMware. Your instructors are not familiar with VirtualBox; use VMware if at all possible.

2 Download the free VirtualBox softwareIndexup to index

  1. Go to http://www.virtualbox.org/ and download VirtualBox based on what OS you are using. i.e. Linux/OS X/Windows and x32/x64

3 Create and Configure a Virtual MachineIndexup to index

  1. After installing VirtualBox, start it. You will see a window similar to this on your computer:
Virtual Box Opening Screen

Virtual Box Opening Screen

  1. Click on the New icon in the toolbar, or go to the Menu bar, Machine, New, or press Ctrl+N to create a new virtual machine.

3.1 Name and operating systemIndexup to index

Set the Name, Type, and Version of your new VM

Set the Name, Type, and Version of your new VM

  1. Name: Choose a name for your new Virtual Machine: If your course and term is CST1234 and 15W, then use the name CST1234-15W-CentOS-6 (no spaces). You can invent your own virtual machine name, if you prefer.

  2. Type: Linux

  3. Version: Choose either Red Hat (32-bit) or Other Linux (32-bit) Do not choose 64 bit!

  4. Double check your settings and click Next.

3.2 Memory Size (RAM)Indexup to index

Set Memory Size to 1024 MB (1 GB)

Set Memory Size to 1024 MB (1 GB)

  1. The installation software requires more memory than the running CentOS server. If you are installing or re-installing your system, set your VM Memory to at least 1024MB (1 GB) before you continue. You can reduce the memory later.

  2. Click Next

3.3 Hard DriveIndexup to index

  1. Select create a virtual hard drive now and then Create.

Another window will open.

3.4 Hard drive file typeIndexup to index

  1. Select VDI (VirtualBox Disk Image) and then Next.

3.5 Storage on physical hard driveIndexup to index

  1. Select Dynamically allocated and then Next.

3.6 File Location and SizeIndexup to index

Create a 2GB Hard Drive

Create a 2GB Hard Drive

  1. Leave the default file name in the name box.

  2. For the size of the virtual hard drive enter 2GB (actually type the number 2 and the letters GB into the box) and then Create.

3.7 PAE SettingsIndexup to index

The PAE/NX feature must be enabled or VirtualBox will not install CentOS.

  1. Click on the Settings icon in the toolbar or go to the menu, Machine, Settings

  2. In the left hand navigation pane, go to System

  3. Go to the tab that says Processor

Enable PAE/NX Extended Features

Enable PAE/NX Extended Features

  1. Where it says “Extended Features: Enable PAE/NX”, make sure this feature is enabled. Turn it on.

  2. Click OK.

3.8 Disable Unnecessary HardwareIndexup to index

  1. Open the Settings window.

  2. In the left hand navigation pane, go to Audio.

  3. Un-check Enable Audio. Turn this off.

  4. In the left hand navigation pane, go to USB.

  5. Un-check Enable USB Controller. Turn this off.

  6. Click OK.

If either of these things re-enables itself, don’t fight it. Just move on.

3.9 NetworkingIndexup to index

  1. Open the Settings window.

  2. In the left hand navigation pane, go to Network.

  3. Select the tab for Adapter 1.

Enable Network Adapter 1 and attach to NAT

Enable Network Adapter 1 and attach to NAT

  1. Make sure that Enable Network Adapter is checked.

  2. Make sure that Attached to: is set to just NAT (not NAT Network, just simple NAT).

3.9.1 Enable Port Forwarding for SSHIndexup to index

When using NAT with VirtualBox, by default the IP address will always be 10.0.2.15 for every new virtual machine. (This is not how VMware does their NAT virtual machines.) To use SSH to connect from your host O/S to the VirtualBox VM behind NAT, you must setup and use Port Forwarding on each virtual machine.

  1. In the Network settings, click the drop-down arrow next to Advanced to show the advanced settings that includes the Port Forwarding button.

  2. Toward the bottom of network Adapter 1, select the link button called Port Forwarding. A new window will open named Port Forwarding Rules.

  3. In the Port Forwarding Rules window, locate the tiny add new rule icon at the far right of the dialog box. It is the top icon of the two and looks like a green “plus” sign. Select it.

Create a Port Forwarding Rule for SSH

Create a Port Forwarding Rule for SSH

  1. Change the Name of the new rule rule from Rule 1 to SSH.

  2. Leave the Protocol as TCP.

  3. Leave the Host IP field blank (empty).

  4. Set the Host Port to some unused port on your Host O/S, e.g. try 2222 as a likely free port. Make sure you choose a port that will be unique for this virtual machine. If you have multiple Virtual Box virtual machines, each will need a different Host Port number.

  5. Leave the Guest IP field blank (empty).

  6. Set the Guest Port to 22. (The SSH service on your Guest VM uses port 22.)

  7. Select OK to close this window and return to the Network window.

3.9.2 Using SSH to connect to your VirtualBox VMIndexup to index

Refer back to this section once you have installed CentOS and enabled networking.

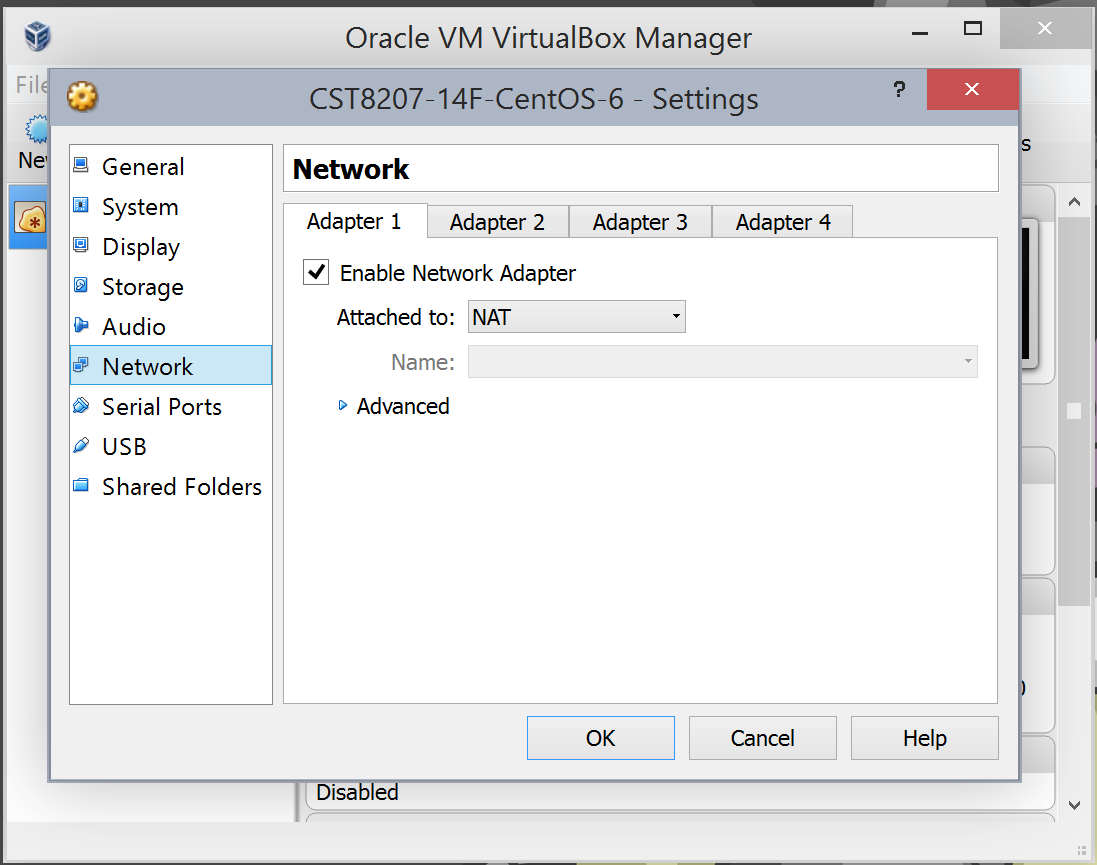
You cannot connect from your Host O/S to the Virtual Box private address 10.0.2.15 of a virtual machine using NAT networking. You must use Port Forwarding with NAT networking under Virtual Box.

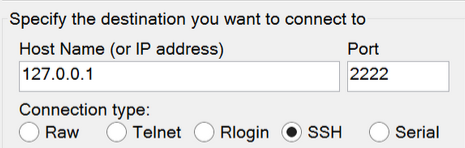
When using Putty or any other client SSH program on your Host O/S to connect to this Virtual Box virtual machine, set up Port Forwarding in your VM and then use the following settings in your SSH client program to connect to the VM:

  • Host: 127.0.0.1
  • Port: 2222 (or whatever port forwarding port number you chose, above)
Set Host Name and Port Number in your Client

Set Host Name and Port Number in your Client

For this client connection to work:

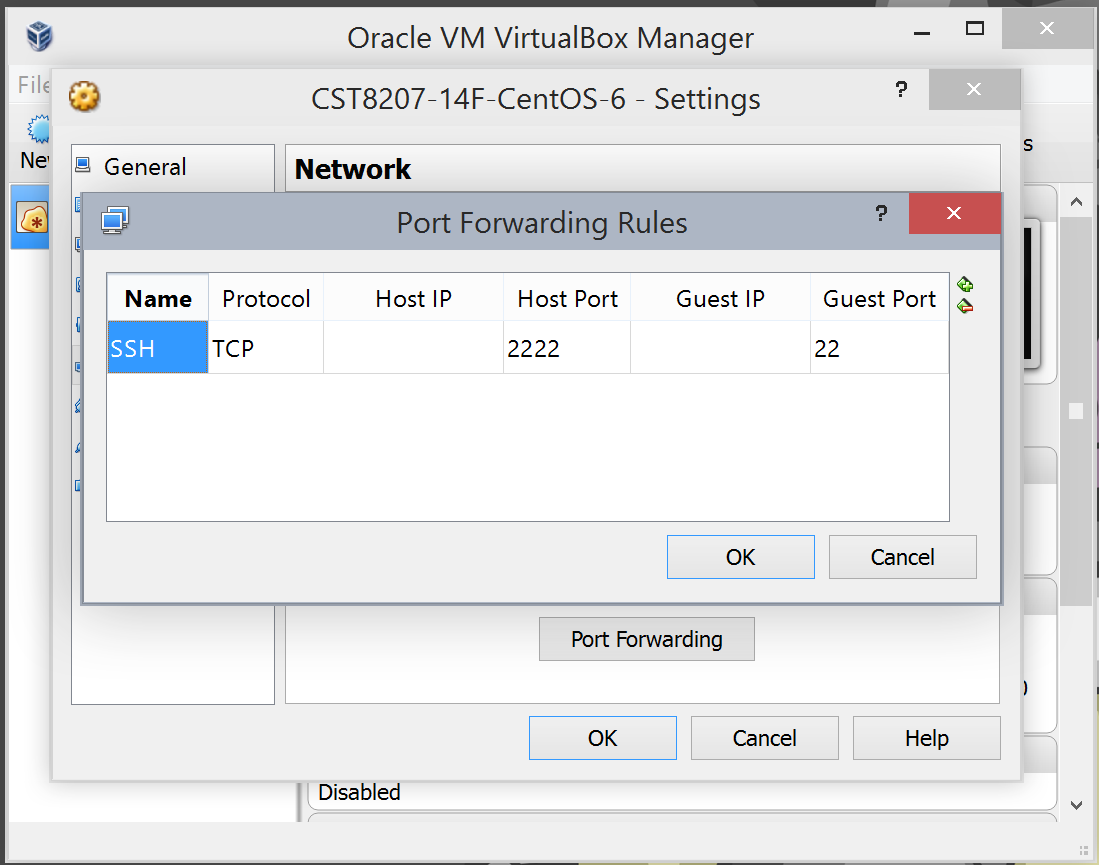
  1. You must have created a Network Port Forwarding rule in your CentOS virtual machine that forwards the 2222 port on your local Host O/S machine to port 22 at the private IP address of the running Virtual Box VM.
  2. You must have enabled Networking in your CentOS virtual machine.
  3. The sshd service must be available in your CentOS virtual machine.

If you have multiple Virtual Box virtual machines using NAT networking, you must give each one a different local Host Port number. (Choose host port numbers above 1024 if running Virtual Box unprivileged under Linux or MacOSX.)

4 Booting CentOS from the CD/DVD driveIndexup to index

To install CentOS, we need to download and connect the CentOS ISO image file to the virtual CD/DVD drive of the VirtualBox Virtual Machine and make sure that the system chooses that CD/DVD drive at boot time.

4.1 Configuring the Boot OrderIndexup to index

  1. Open the Settings window.

  2. In the left hand navigation pane, go to System

  3. Go to the tab that says Motherboard

Change Boot Order to put CD/DVD before Hard Drive

Change Boot Order to put CD/DVD before Hard Drive

  1. In the box labelled Boot Order: Uncheck the Floppy and use the right hand arrow buttons to move Floppy to the third spot, under Hard Disk. Make the CD/DVD (checked) first, the Hard Disk (checked) second, the Floppy (not checked) third, and the Network (not checked) last.

  2. Make sure only the CD/DVD and Hard Disk are enabled.

  3. Click OK.

4.2 Connect the CentOS ISO file to the virtual CD/DVD driveIndexup to index

  1. Open the Settings window.

  2. In the left hand navigation pane, go to Storage

Under Storage, you will see Storage Tree with a Controller:IDE, and inside the Controller is your VM name and under that is a poorly shown visual CD drive icon with Empty beside it.

  1. Click on the CD line, where it says Empty. A new Attributes and Information section opens on the right in the same window.
Settings for Empty CD/DVD Drive

Settings for Empty CD/DVD Drive

  1. In the right hand pane, under Attributes, beside CD/DVD Drive, you will see a box containing IDE Secondary Master. There is a tiny CD icon on the right of this box. Click on the CD icon to open a menu that lets you set the path to your downloaded CentOS CD ISO image file.

  2. Use the menu to navigate to your previously downloaded CentOS ISO image file and select it. The window will close and you will return to the Storage settings window.

  3. Verify that in the Storage settings window, on the right under Information, you see Size: 339.00 MB (the size of the CentOS Installation CD) and the Location: is the location of your CentOS install CD ISO image file.

  4. Click OK.

5 Install CentOSIndexup to index

  1. Now, power on (boot) your virtual machine. You should see the CentOS installation screen:
Welcome to CentOS Boot Window

Welcome to CentOS Boot Window

  1. Click in the window and use the arrow keys to stop the Automatic boot.

  2. Continue to install CentOS from the installation CD using most of the directions starting at “Installing the CentOS 6 Operating System” in CentOS Install and Configure. Here are some changes you will need to make to those instructions:
    1. During the installation, you will need come back to VirtualBox to re-attach the ISO image to the virtual CD/DVD drive after verifying the media contents.
    2. You cannot use the VMware instructions for using an SSH client to connect from your Host O/S to the private IP of your VM, since VirtualBox completely hides the NAT private IP address from the Host O/S. To use an SSH client to connect to a VirtualBox VM, follow the Using SSH to connect instructions in the Networking section of this document.
  3. After you have finished installing CentOS, you should shut down your CentOS machine safely and return to VirtualBox Settings, System, Motherboard, and change the Base Memory back down to to 256MB. This will make snapshots you take much smaller in size.

6 Install VirtualBox Guest AdditionsIndexup to index

VirtualBox Guest Additions are equivalent to VMware Tools You must have a working CentOS virtual machine to install them.

Once you have CentOS running, you can install the VirtualBox Guest Additions that improve virtual machine performance. Here’s how:

  1. You may need to download and install the VBoxGuestAdditions.iso file separately from VirtualBox. Do this, if necessary.

  2. Start (boot) your CentOS VM.

  3. Use the Menu bar on your CentOS VM console to go to Devices and select Insert Guest Additions CD Image at the bottom of the menu. This action should connect the Guest Additions CD ISO file to your virtual CD/DVD drive.

  4. Open the Settings window, select Storage, and in the Storage Tree box verify that instead of Empty it says VBoxGuestAdditions.iso beside the CD/DVD icon.

  5. In the CentOS console window, log in as root and run the command file -s /dev/sr0 and make sure the output starts with: /dev/sr0: ISO 9660 CD-ROM filesystem data 'VBOXADDITIONS_

  6. Create a mount point for the CD/DVD: mkdir –p /mnt/cdrom

  7. Mount the CD/DVD on the mount point: mount /dev/sr0 /mnt/cdrom
    • You will see a warning about mounting read-only. This is good.

To install the Guest Additions, some software must be compiled and installed in the current Linux kernel. We need to install some packages to make this possible.

  1. Install the gcc compiler package: yum install gcc
    • Many other dependency packages will also be installed with gcc.
  2. Find out the version (release) of the kernel that you are running: uname -r

  3. Install the kernel headers package for your running kernel, using the above version number in place of XXX in this command line: yum install kernel-devel-XXX
    • You can also use: yum install kernel-devel-$( uname -r )
  1. Execute the installer program /mnt/cdrom/VBoxLinuxAdditions.run that should install the VirtualBox Guest Additions.
    • If you see error messages that suggest packages to download, do what they say and try the installer again.
    • The successful install will look like this:
Building Virtual Box Guest Additions

Building Virtual Box Guest Additions

You can ignore the warning about not finding the Window System, since your CentOS machine does not run a window system.

7 Notes on using VirtualBoxIndexup to index

  1. Snapshots can be made by going to the Menu, Machine, Take snapshot, or use the Snapshots button near the top right of the main VirtualBox Manager window.

  2. VirtualBox uses private IP address 10.0.2.15 as the IP for every VM using NAT networking, and that private IP address is not visible to the Host O/S, which is not the way VMware does it. You can read about why here: https://blogs.oracle.com/fatbloke/entry/networking_in_virtualbox1

  3. VirtualBox has a FAQ section that may be of use to you: https://www.virtualbox.org/manual/ch12.html

  4. You may have network problems (no Internet) if you try to start a VirtualBox VM at home with NAT networking while your Host computer is connected to the Algonquin VPN.
    • If you see private 10. addresses in /etc/resolv.conf, instead of only one single 172. address, you may have problems.
    • Turn off the VPN, then start up the VM (or restart networking), then turn the VPN back on after the VM is running.
    • Let Ian! know if you can make this work.

8 Document LicenseIndexup to index

© 2014, Joshua Caseley. Licensed under the Creative Commons Attribution 3.0 license, http://creativecommons.org/licenses/by/3.0/

Rewritten by Ian!, using Joshua’s base document. Thanks, Joshua!

Author: 
| (From an original document by Joshua Caseley.)
| Ian! D. Allen  -  idallen@idallen.ca  -  Ottawa, Ontario, Canada
| Home Page: http://idallen.com/   Contact Improv: http://contactimprov.ca/
| College professor (Free/Libre GNU+Linux) at: http://teaching.idallen.com/
| Defend digital freedom:  http://eff.org/  and have fun:  http://fools.ca/

Plain Text - plain text version of this page in Pandoc Markdown format

Campaign for non-browser-specific HTML   Valid XHTML 1.0 Transitional   Valid CSS!   Creative Commons by nc sa 3.0   Hacker Ideals Emblem   Author Ian! D. Allen